I like to call people up on their birthdays and sing to them.
So someone call me up and croon a little tune, because this blog is FIVE YEARS OLD! And I just can’t believe it.
Naturally, to mark the occasion, I baked a cake. Because what good is a birthday celebration without cake?
Happy birthday to Smells Like Brownies! Here’s to five more years of doing things deliciously (and making my family and friends wait around to eat until I finish staging a hundred photos).
So a few months ago, I made Jake’s birthday cake from a Funfetti box mix. And it was so delicious. Nothing wrong with that. But I’ve been meaning to try out the intimidating from-scratch funfetti cake recipe by Christina Tosi of Milk Bar for almost two years. Just jumping on that bandwagon. And this seemed like a pretty good occasion to bake a fancy cake!
 Before we get started…you know I like to tell you that everything is easy. Sometimes I do exaggerate, or maybe my perspective is just a little skewed. So here’s the real deal on this birthday cake: making the cake actually is easy. And the frosting is a dream. But the assembly is like a nightmare straight from crazytown. Sarah and I are working on a plan to turn this into a beautiful sheet cake…but for now, please enjoy the impractical beauty of a very tall, layered birthday cake!
This cake consists of three main components: cake, frosting, and cookie crumbles. Oh man, cookie crumbles! Christina Tosi is a genius. All cakes should have crunchy crumbles. Let’s start there.
 These cookie bits are meant to taste just like the birthday cake. I actually found them to be a little too sweet, even while I wanted more because of the seriously brilliant crunchy factor. Soon, I will come back with tweaks to the crumble recipe (at which point I will also delete this sentence, just fyi), but please know that they are addictive and yummy exactly as they are. Make some crumbles.
Combine sugars, flour, baking powder, salt, and sprinkles in a large bowl. Jimmies are the best sprinkles for this recipe, and what I had on hand was actually a mixture of rainbow jimmies and a few chocolate jimmies. Mm, chocolate.
With a hand mixer, stir in oil and vanilla extract.
If you are the sort of person who cares about their funfetti cake being pale, then use fake (clear) vanilla extract. This is what the original Milk Bar recipe calls for, and it’s what I used throughout making this cake. However, if you are the sort of person who cares about eating less weird chemicals, then this is not the cake for you. Just kidding. If you are that second person, then you can use real vanilla and your cake and frosting will taste nearly the same and appear less bright white. (But also, do gather your wits because we have barely begun with weird ingredients.)
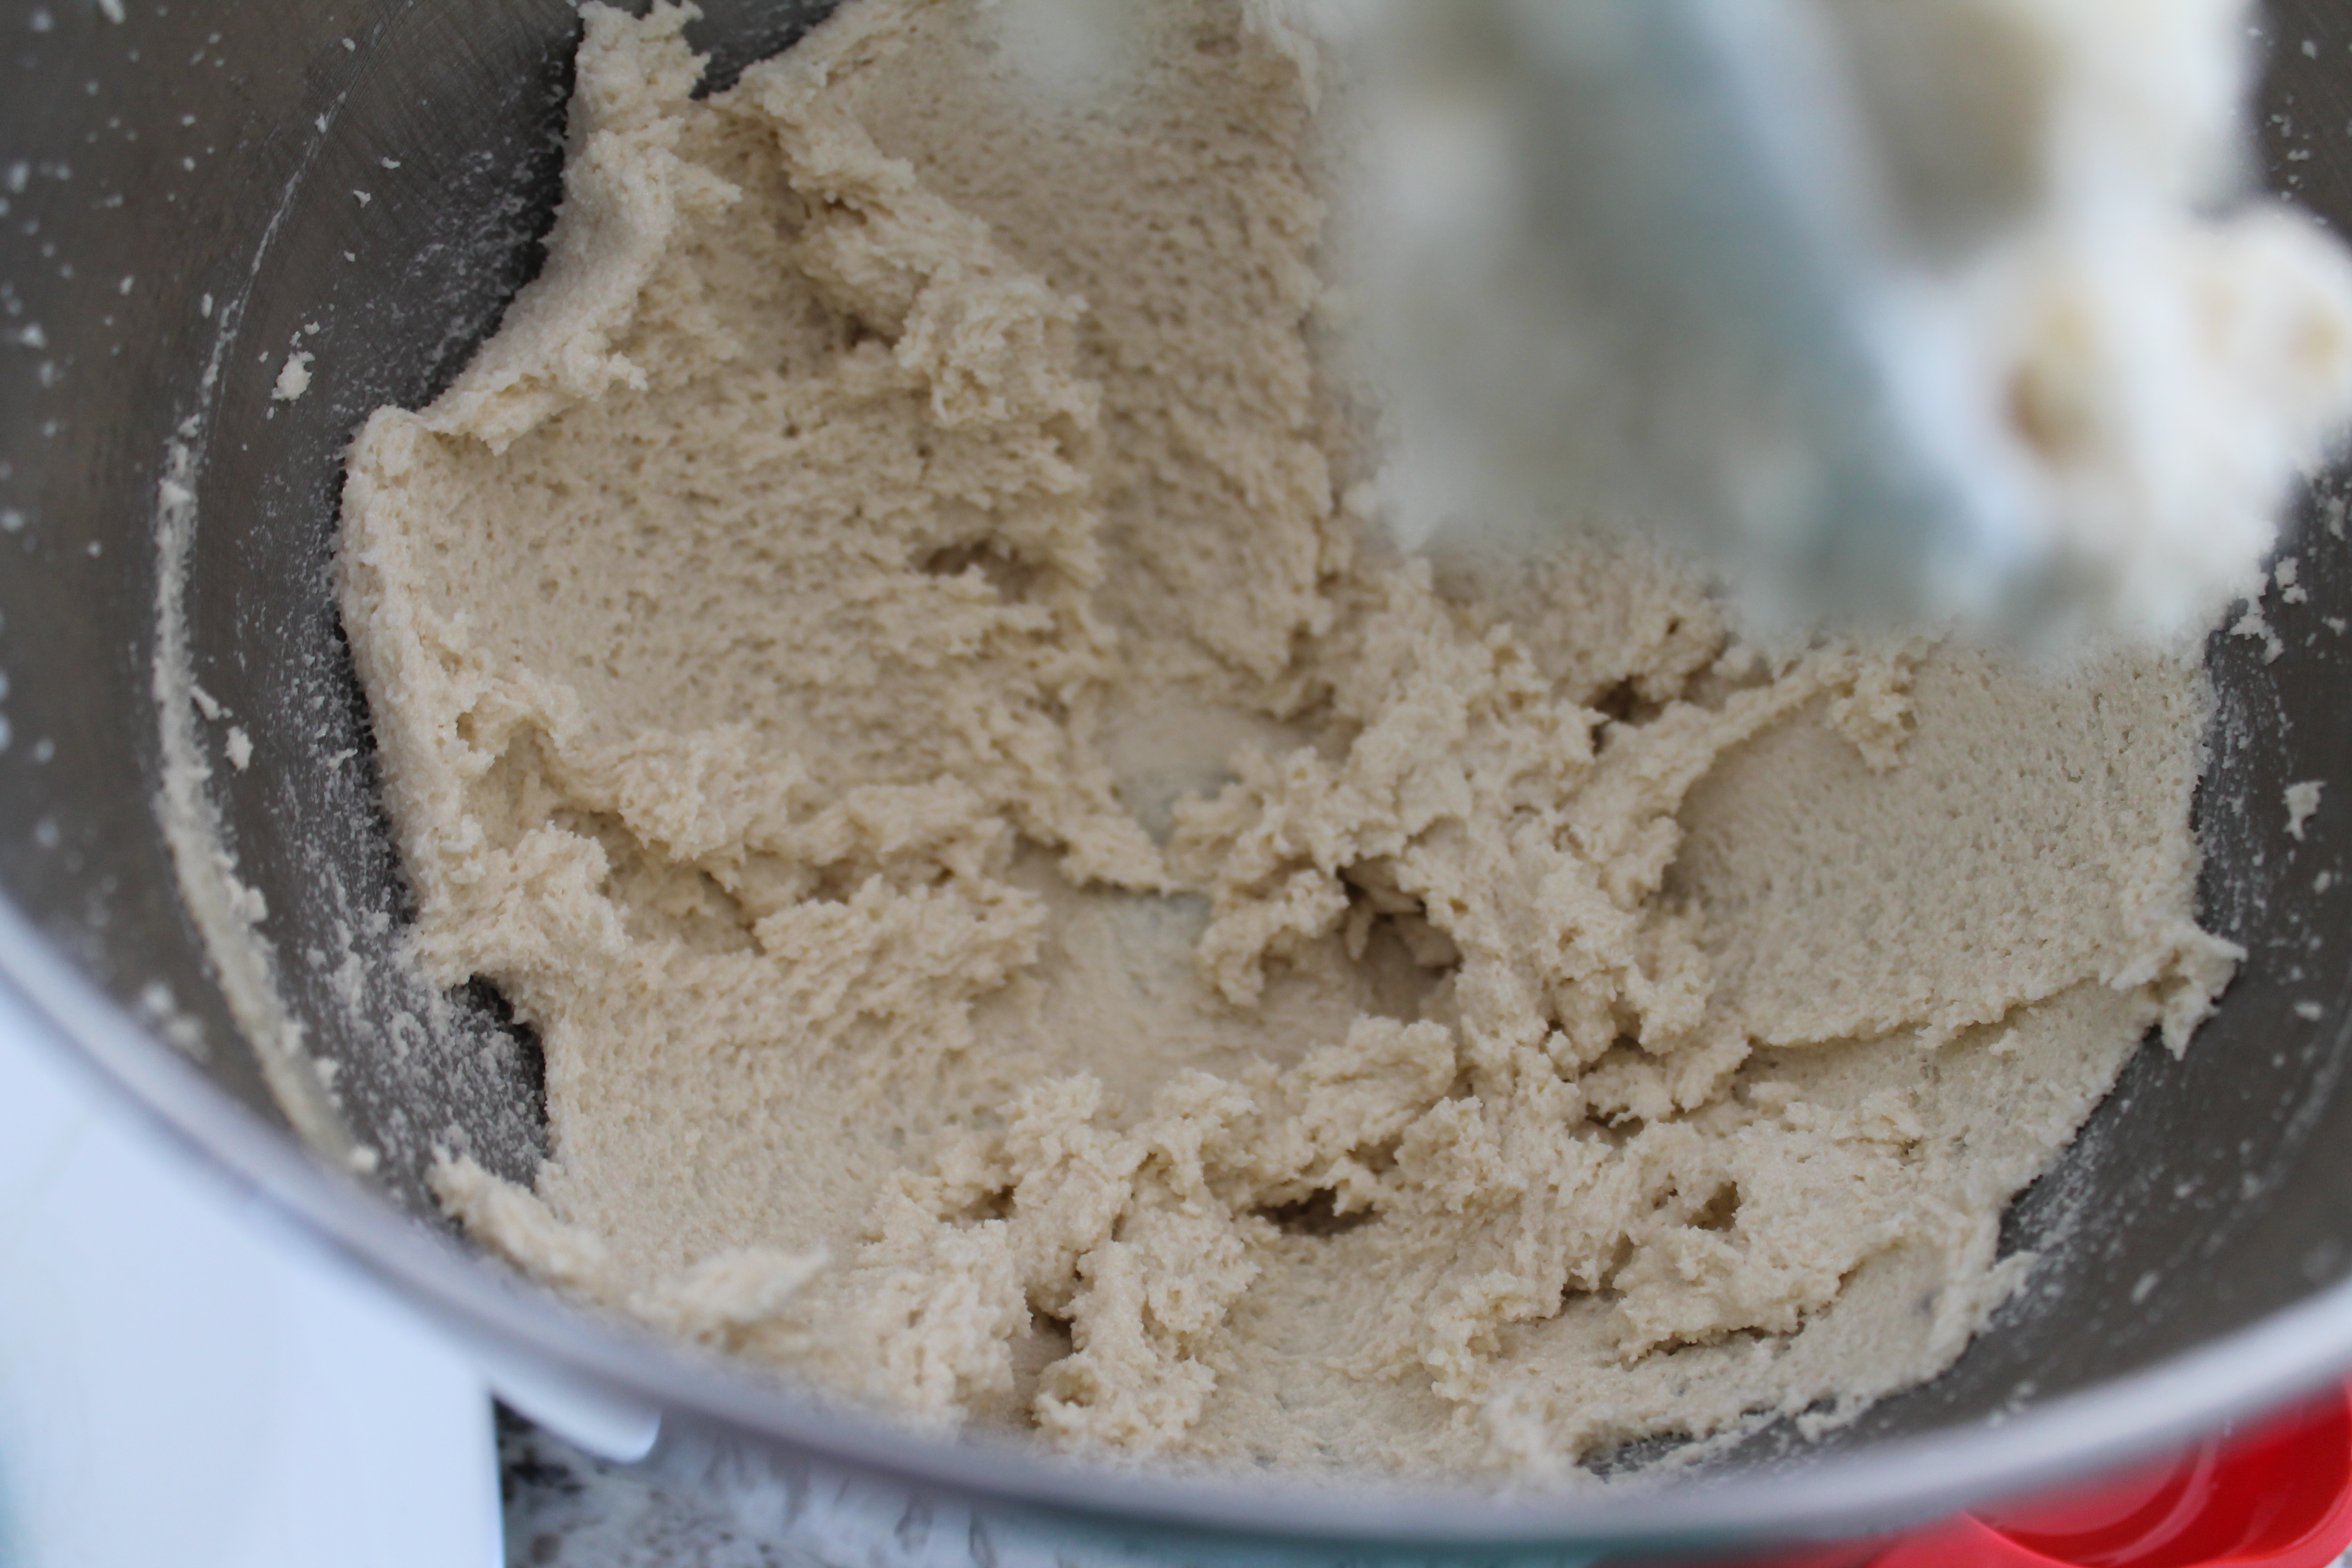
 As the oil incorporates into the dry ingredients, the mixture will naturally form small clumps and crumbles.
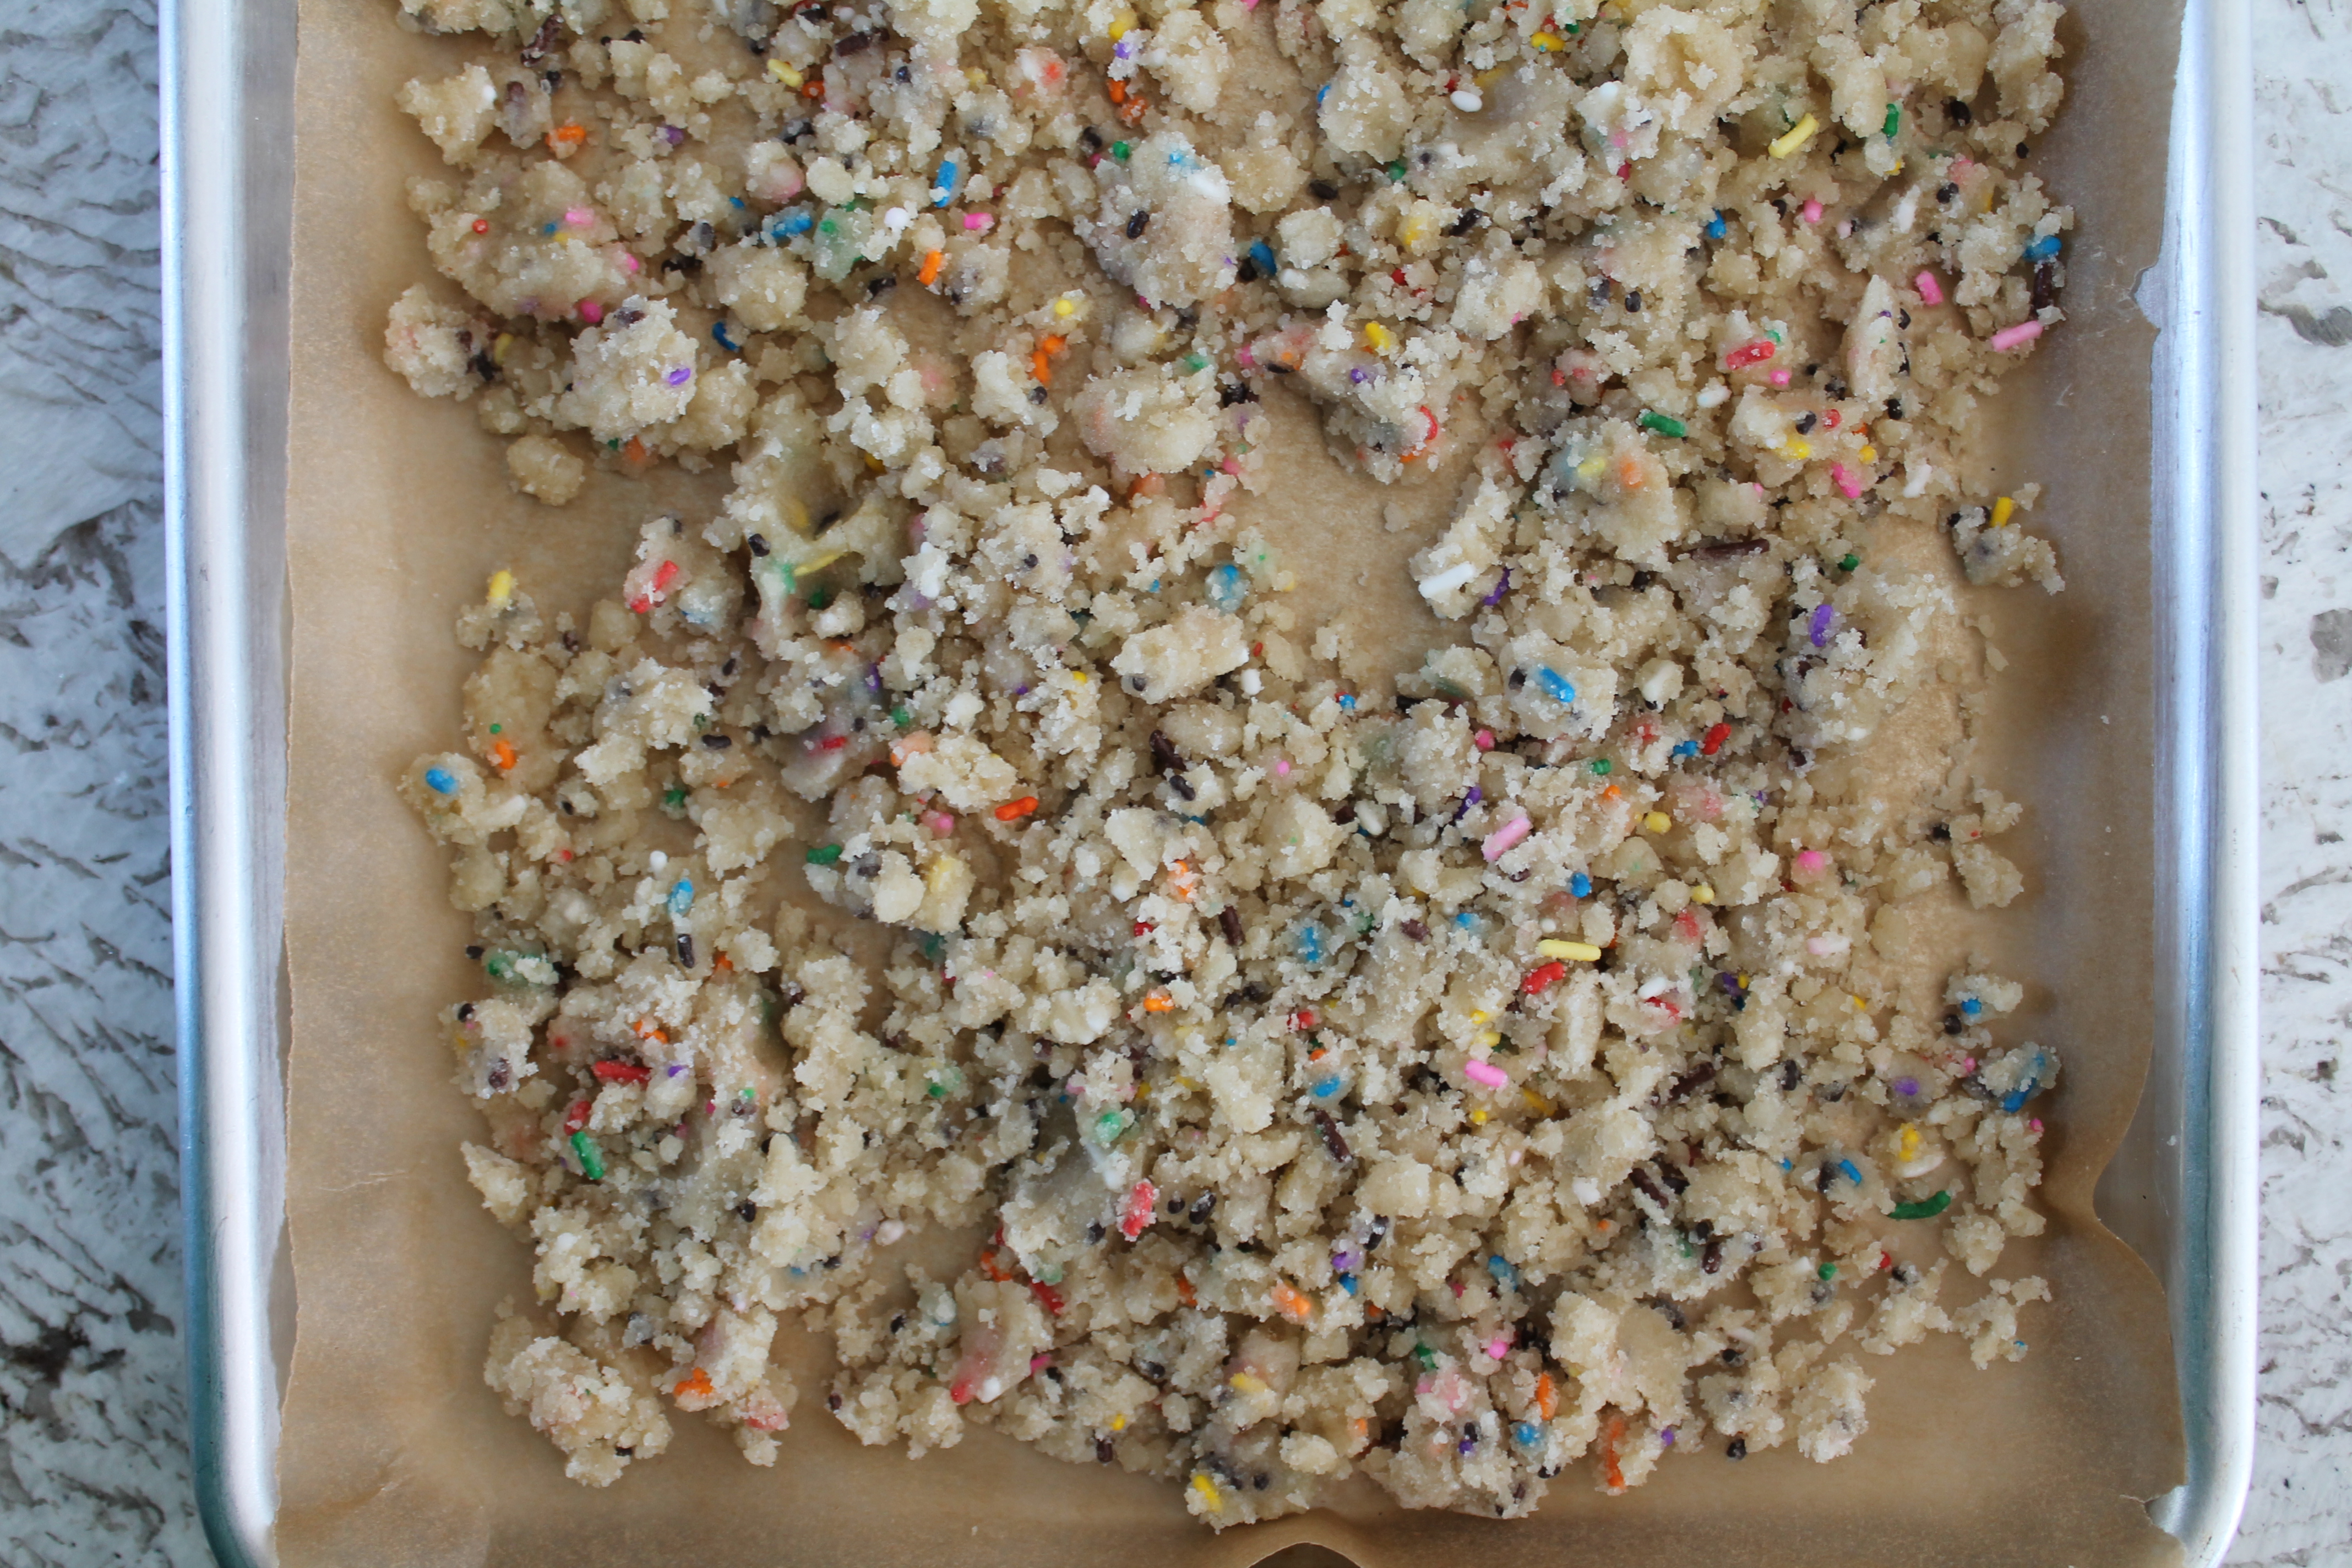
Transfer these crumbles to a baking sheet and bake for 20 minutes, turning the pan halfway, until they are golden and barely crisp on the outside. The crumbles will continue to harden as they cool, but they shouldn’t be soft or squishy when you remove them from the oven.
 Meanwhile, get the cake batter ready.
As I said, this is fairly easy.
Combine butter, shortening, white and light brown sugar in a large bowl and beat about 3 minutes, scraping the sides of the bowl as needed.
 Beat in the eggs, one at a time, then beat another 3 minutes on high speed, until the mixture doubles in volume and turns thick and pale.
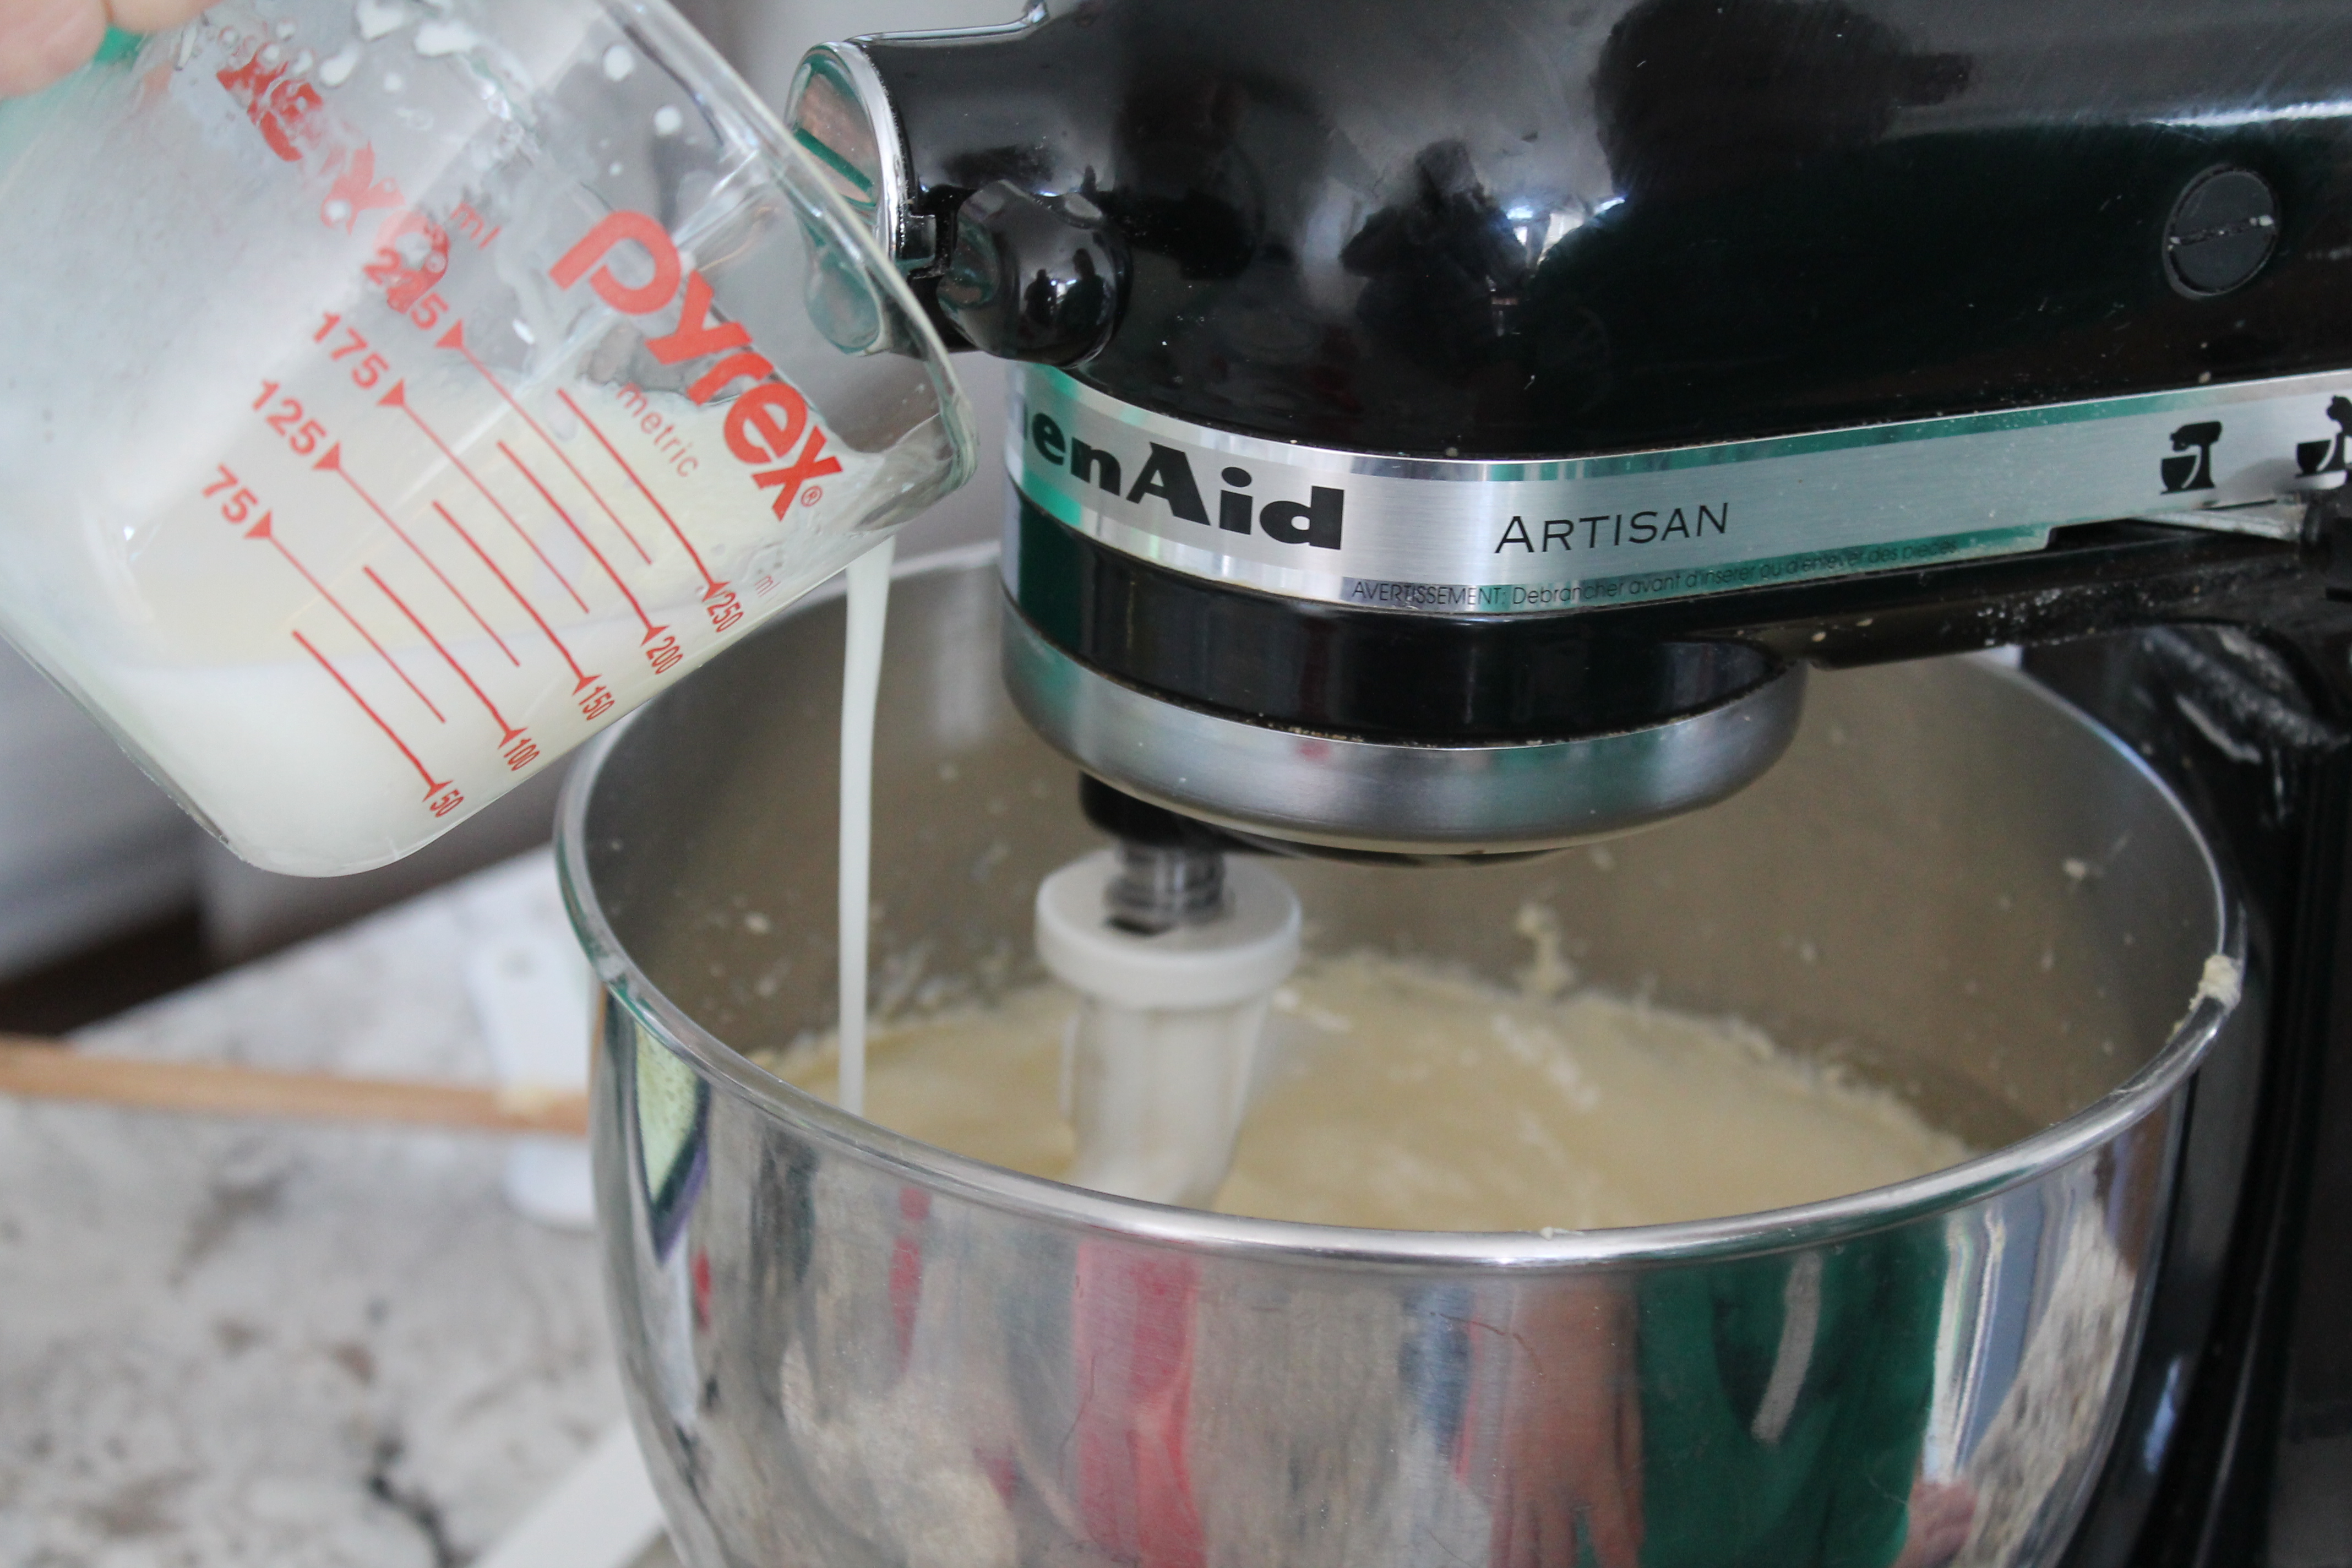 In a glass measuring cup or small bowl, mix together buttermilk, oil, and vanilla. Again, we are using clear, chemical vanilla. Crazy world.
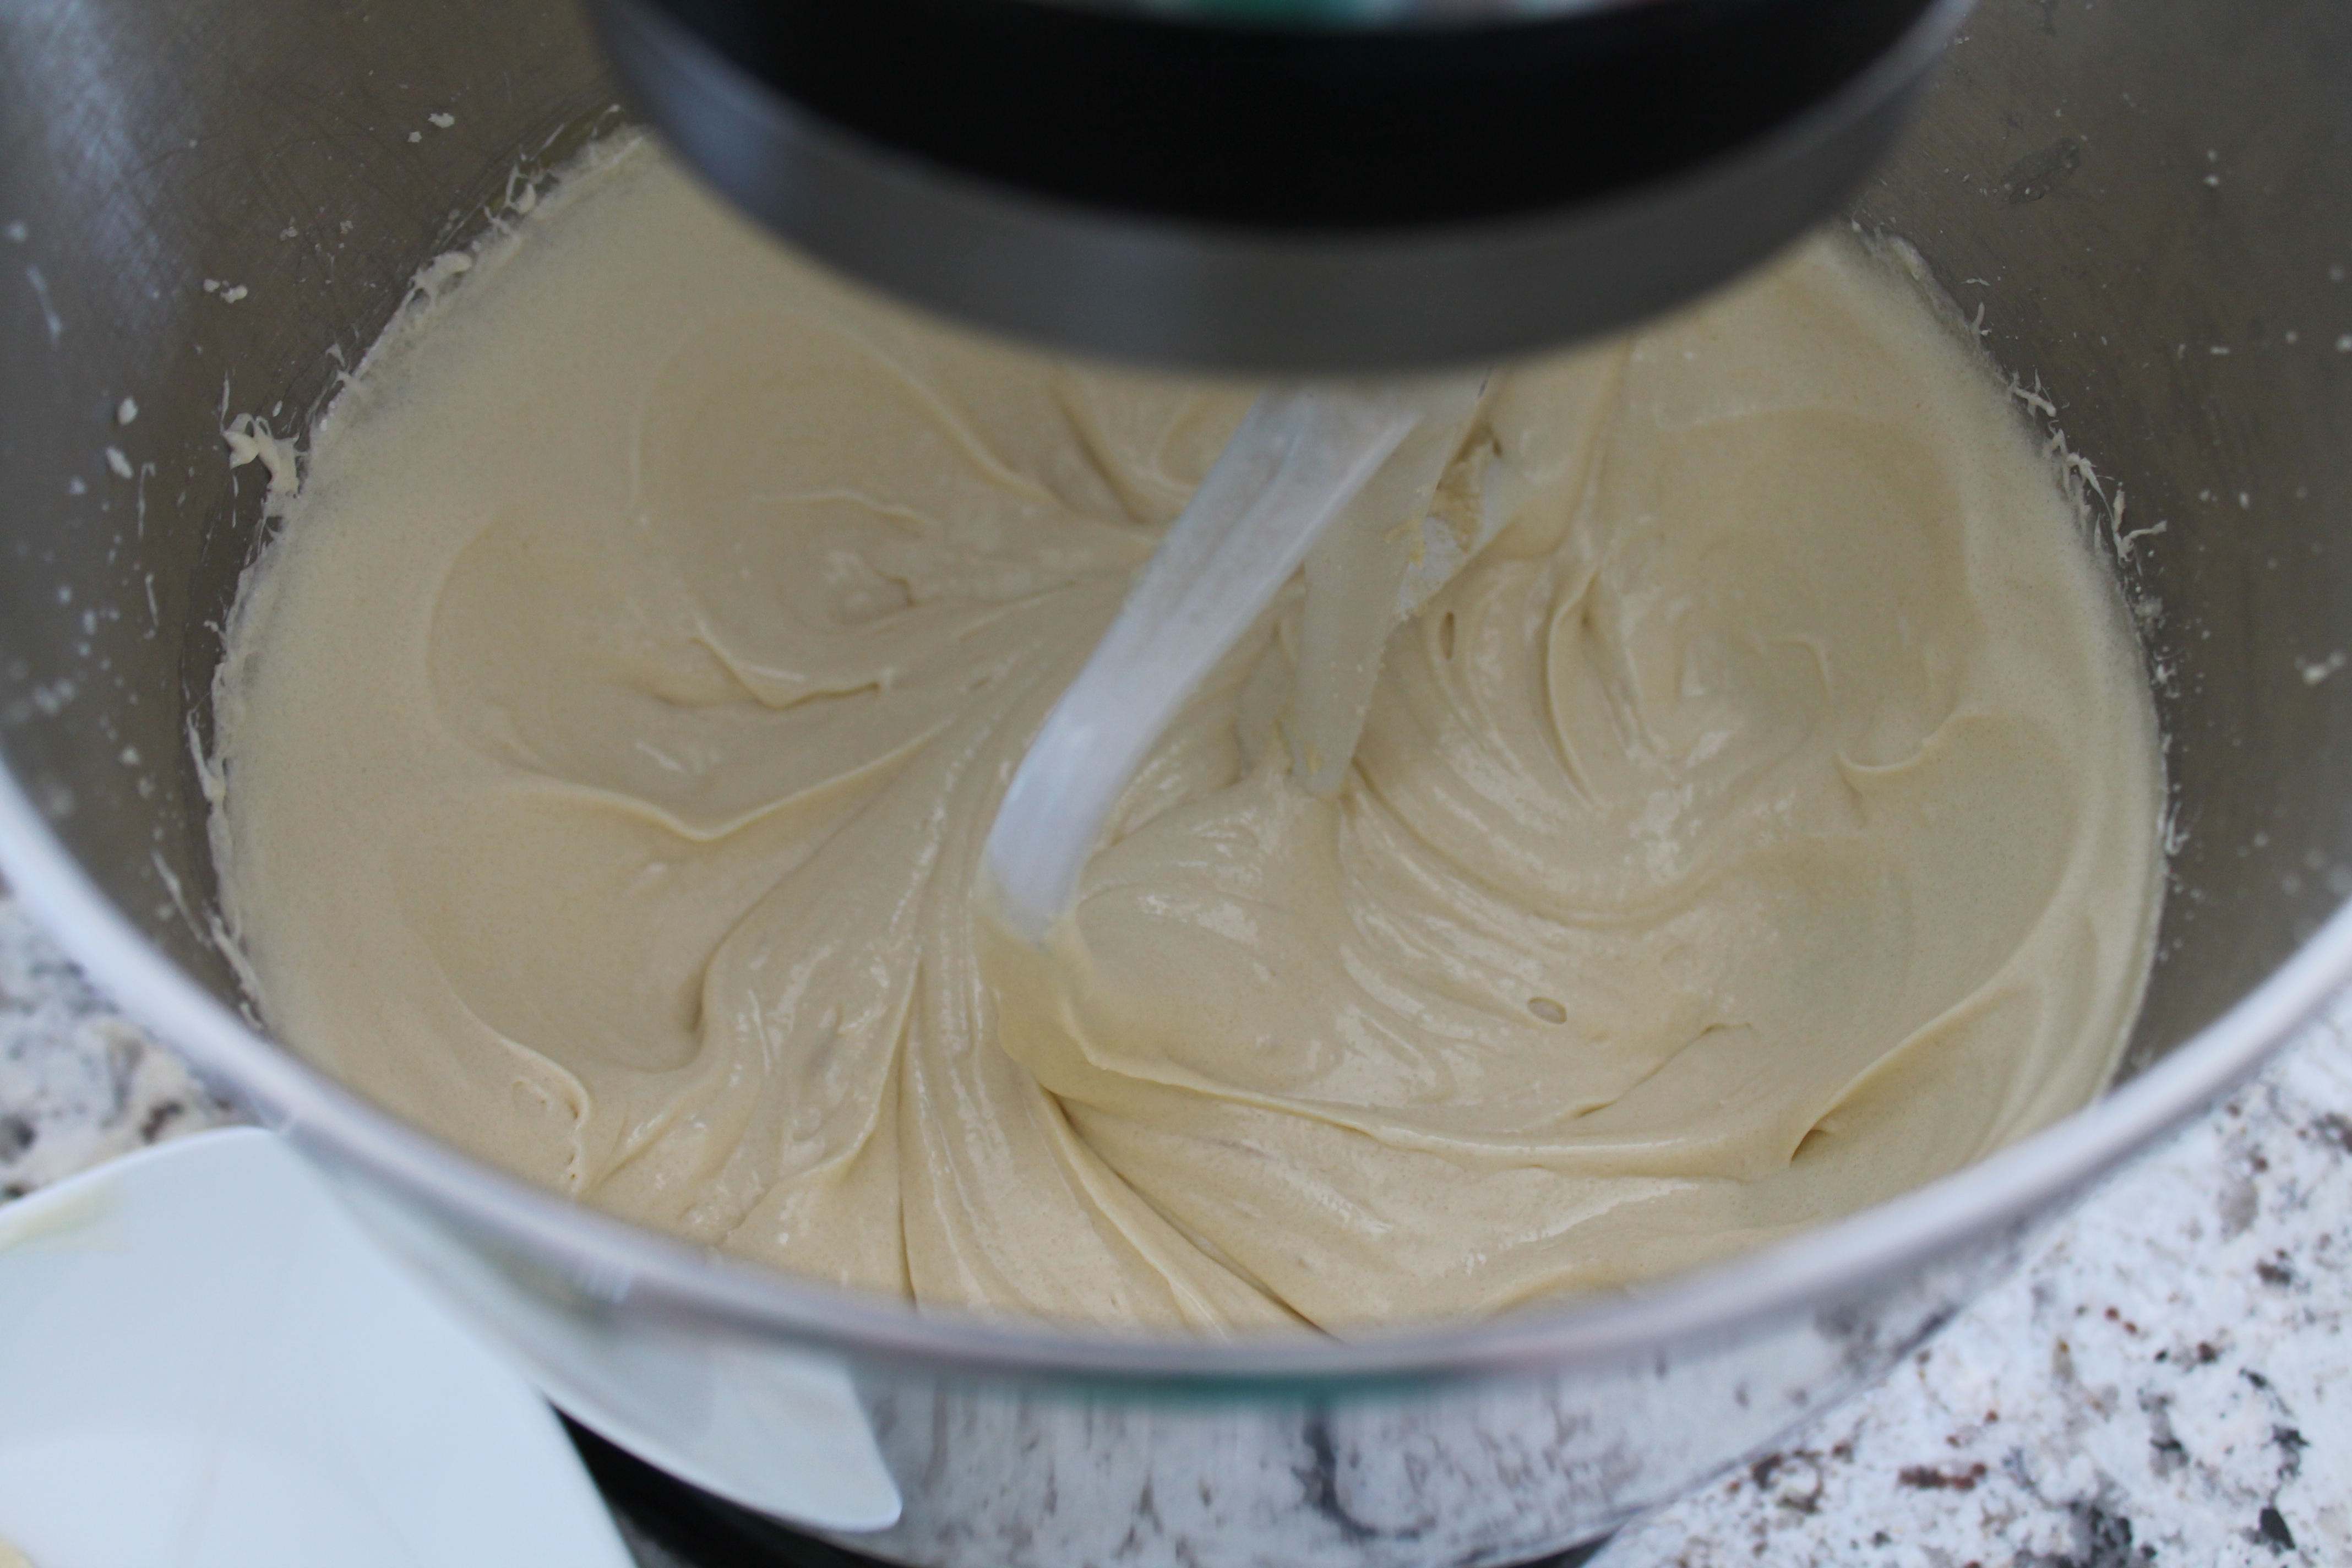
Stream the liquids into the batter with the mixer on low speed, then pump up the volume and beat for 4 minutes, until the mixture is completely smooth and pale, with no streaks of liquid or fat that look separated. We are going for a beautiful emulsion here.
Scrape the sides of the bowl. As in all cake making, it’s really important to make sure everything is blended properly!
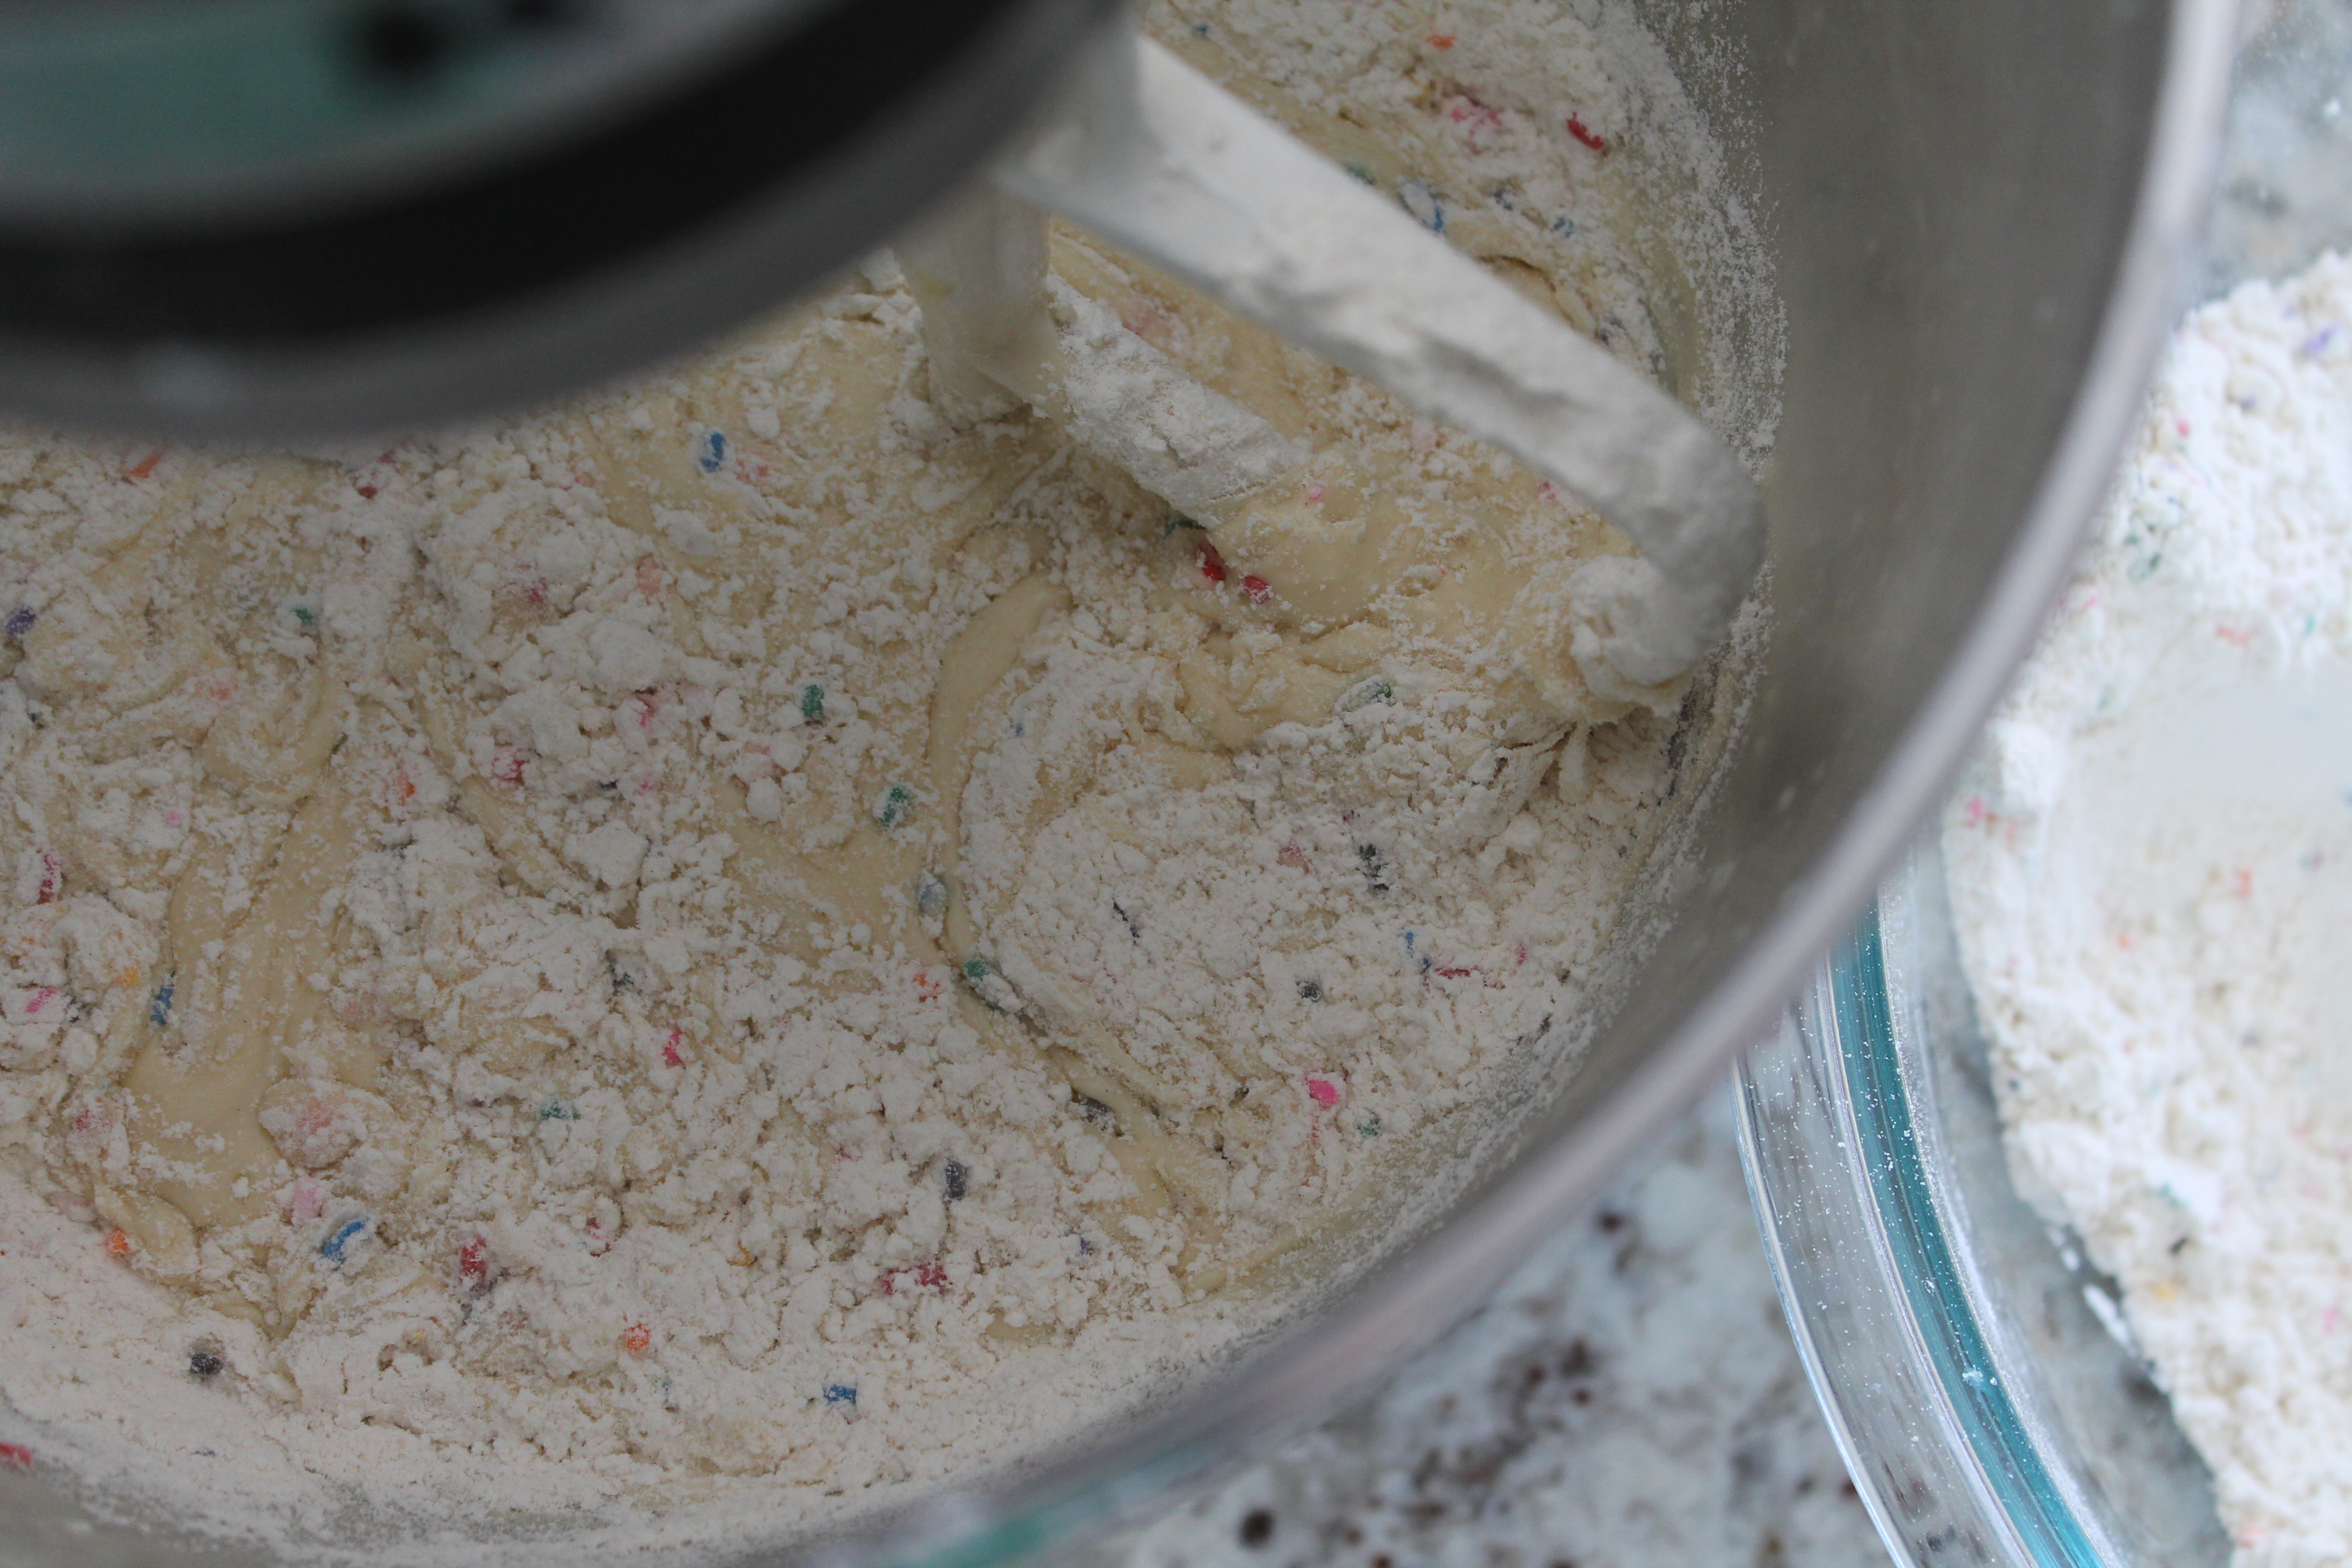 Now add the flour, salt, and baking powder, and sprinkles! I added my dry ingredients in two batches to minimize stirring time.
This recipe calls for cake flour. Cake flour is basically a lower protein, finely milled flour designed for making more tender cakes. I realized a bit belatedly that I did not have enough cake flour on hand…and if that happens to you, never fear! You can use all-purpose flour instead, but you will need to use less of it. For every cup of cake flour, you need 2 tbsp. less of all-purpose flour. So where the original recipe called for 2 cups of cake flour, I used 1¾ cups all-purpose. And the cake was stunning. Of course, if you have cake flour—or read your recipe correctly before you go shopping—that is good, too! Make sure you use all-wheat, unleavened cake flour (none of the blends or self-rising varieties, please).
Stir until just combined, scraping between additions. Don’t overmix the dry ingredients, or the cake will not be tender.
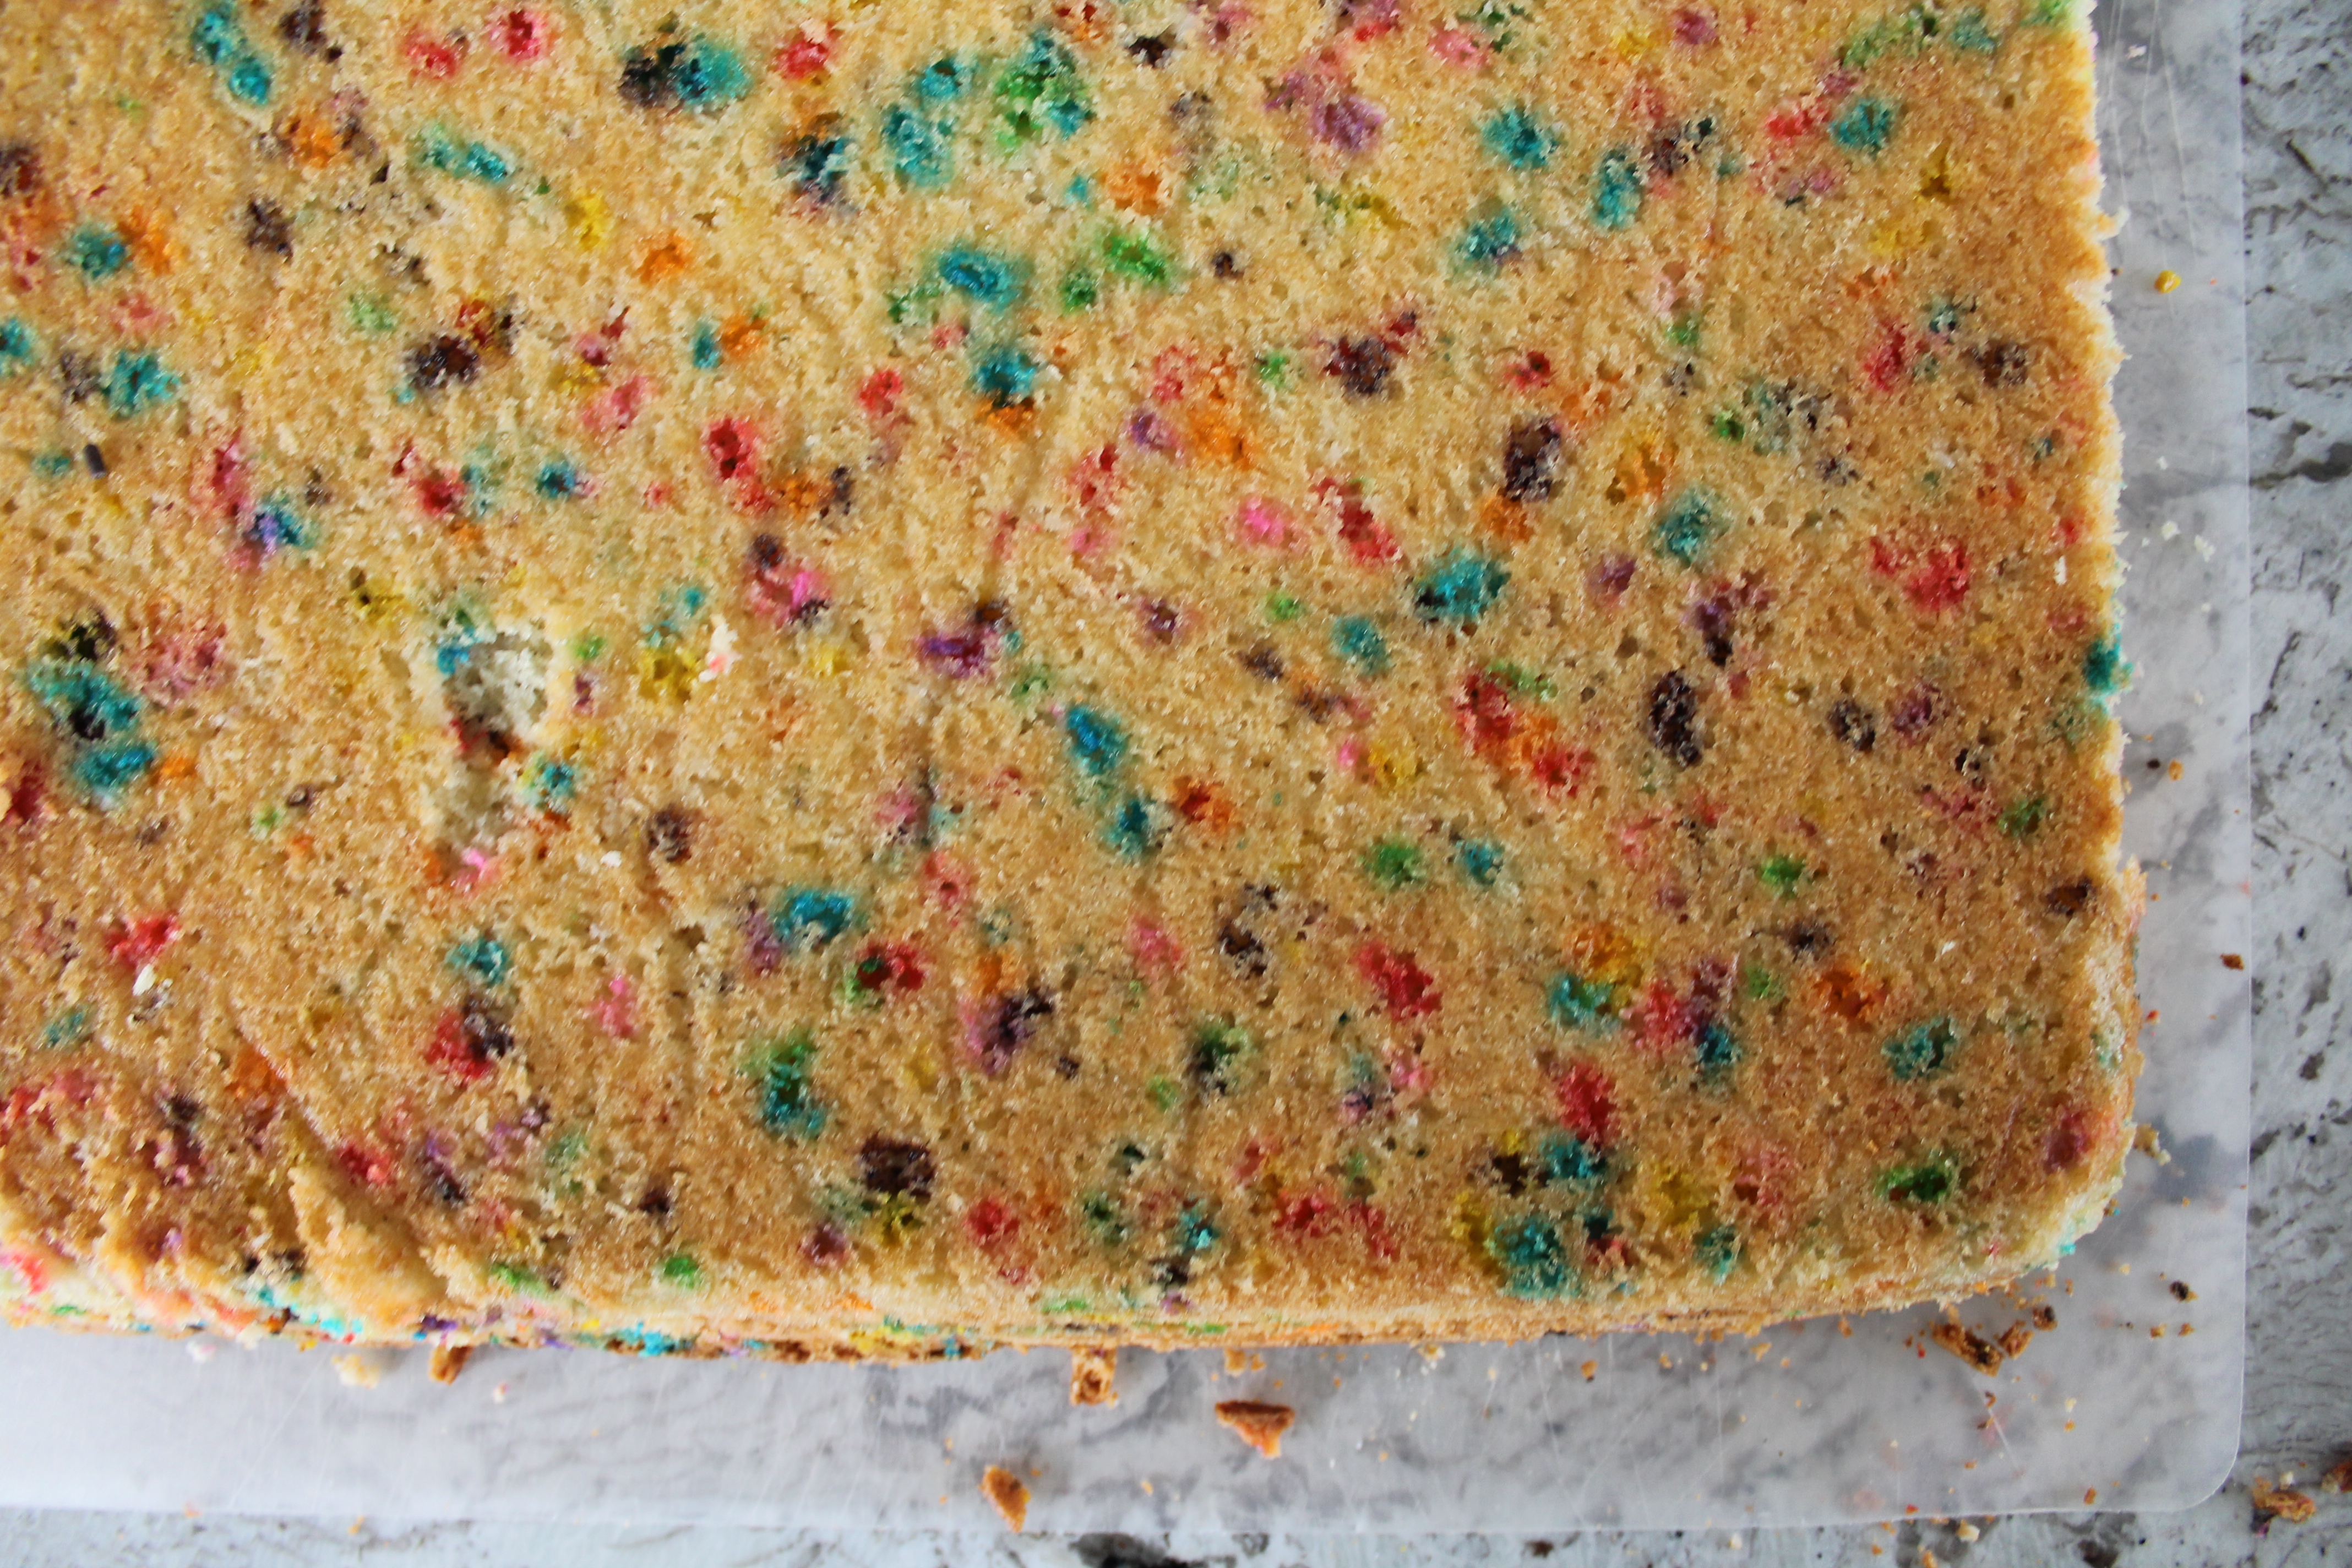
 Scrape the cake batter out into a lightly greased and parchment-lined quarter sheet pan. Never heard of a quarter sheet? It is a heavy-duty rimmed cookie sheet, one-quarter of the size of a full commercial baking sheet. Unlike many types of cookie sheets designed for home bakers, the sizes of commercial baking equipment are standardized! A quarter sheet measures 9″x13″x1″. You don’t have to go out and buy a special pan if you don’t have these on hand, but do make sure you use a pan that is exactly 9″x13″ or you will risk overflow; if you decide to go with a casserole dish, you may need to level your cake before assembly because the edges will likely be taller than the center.
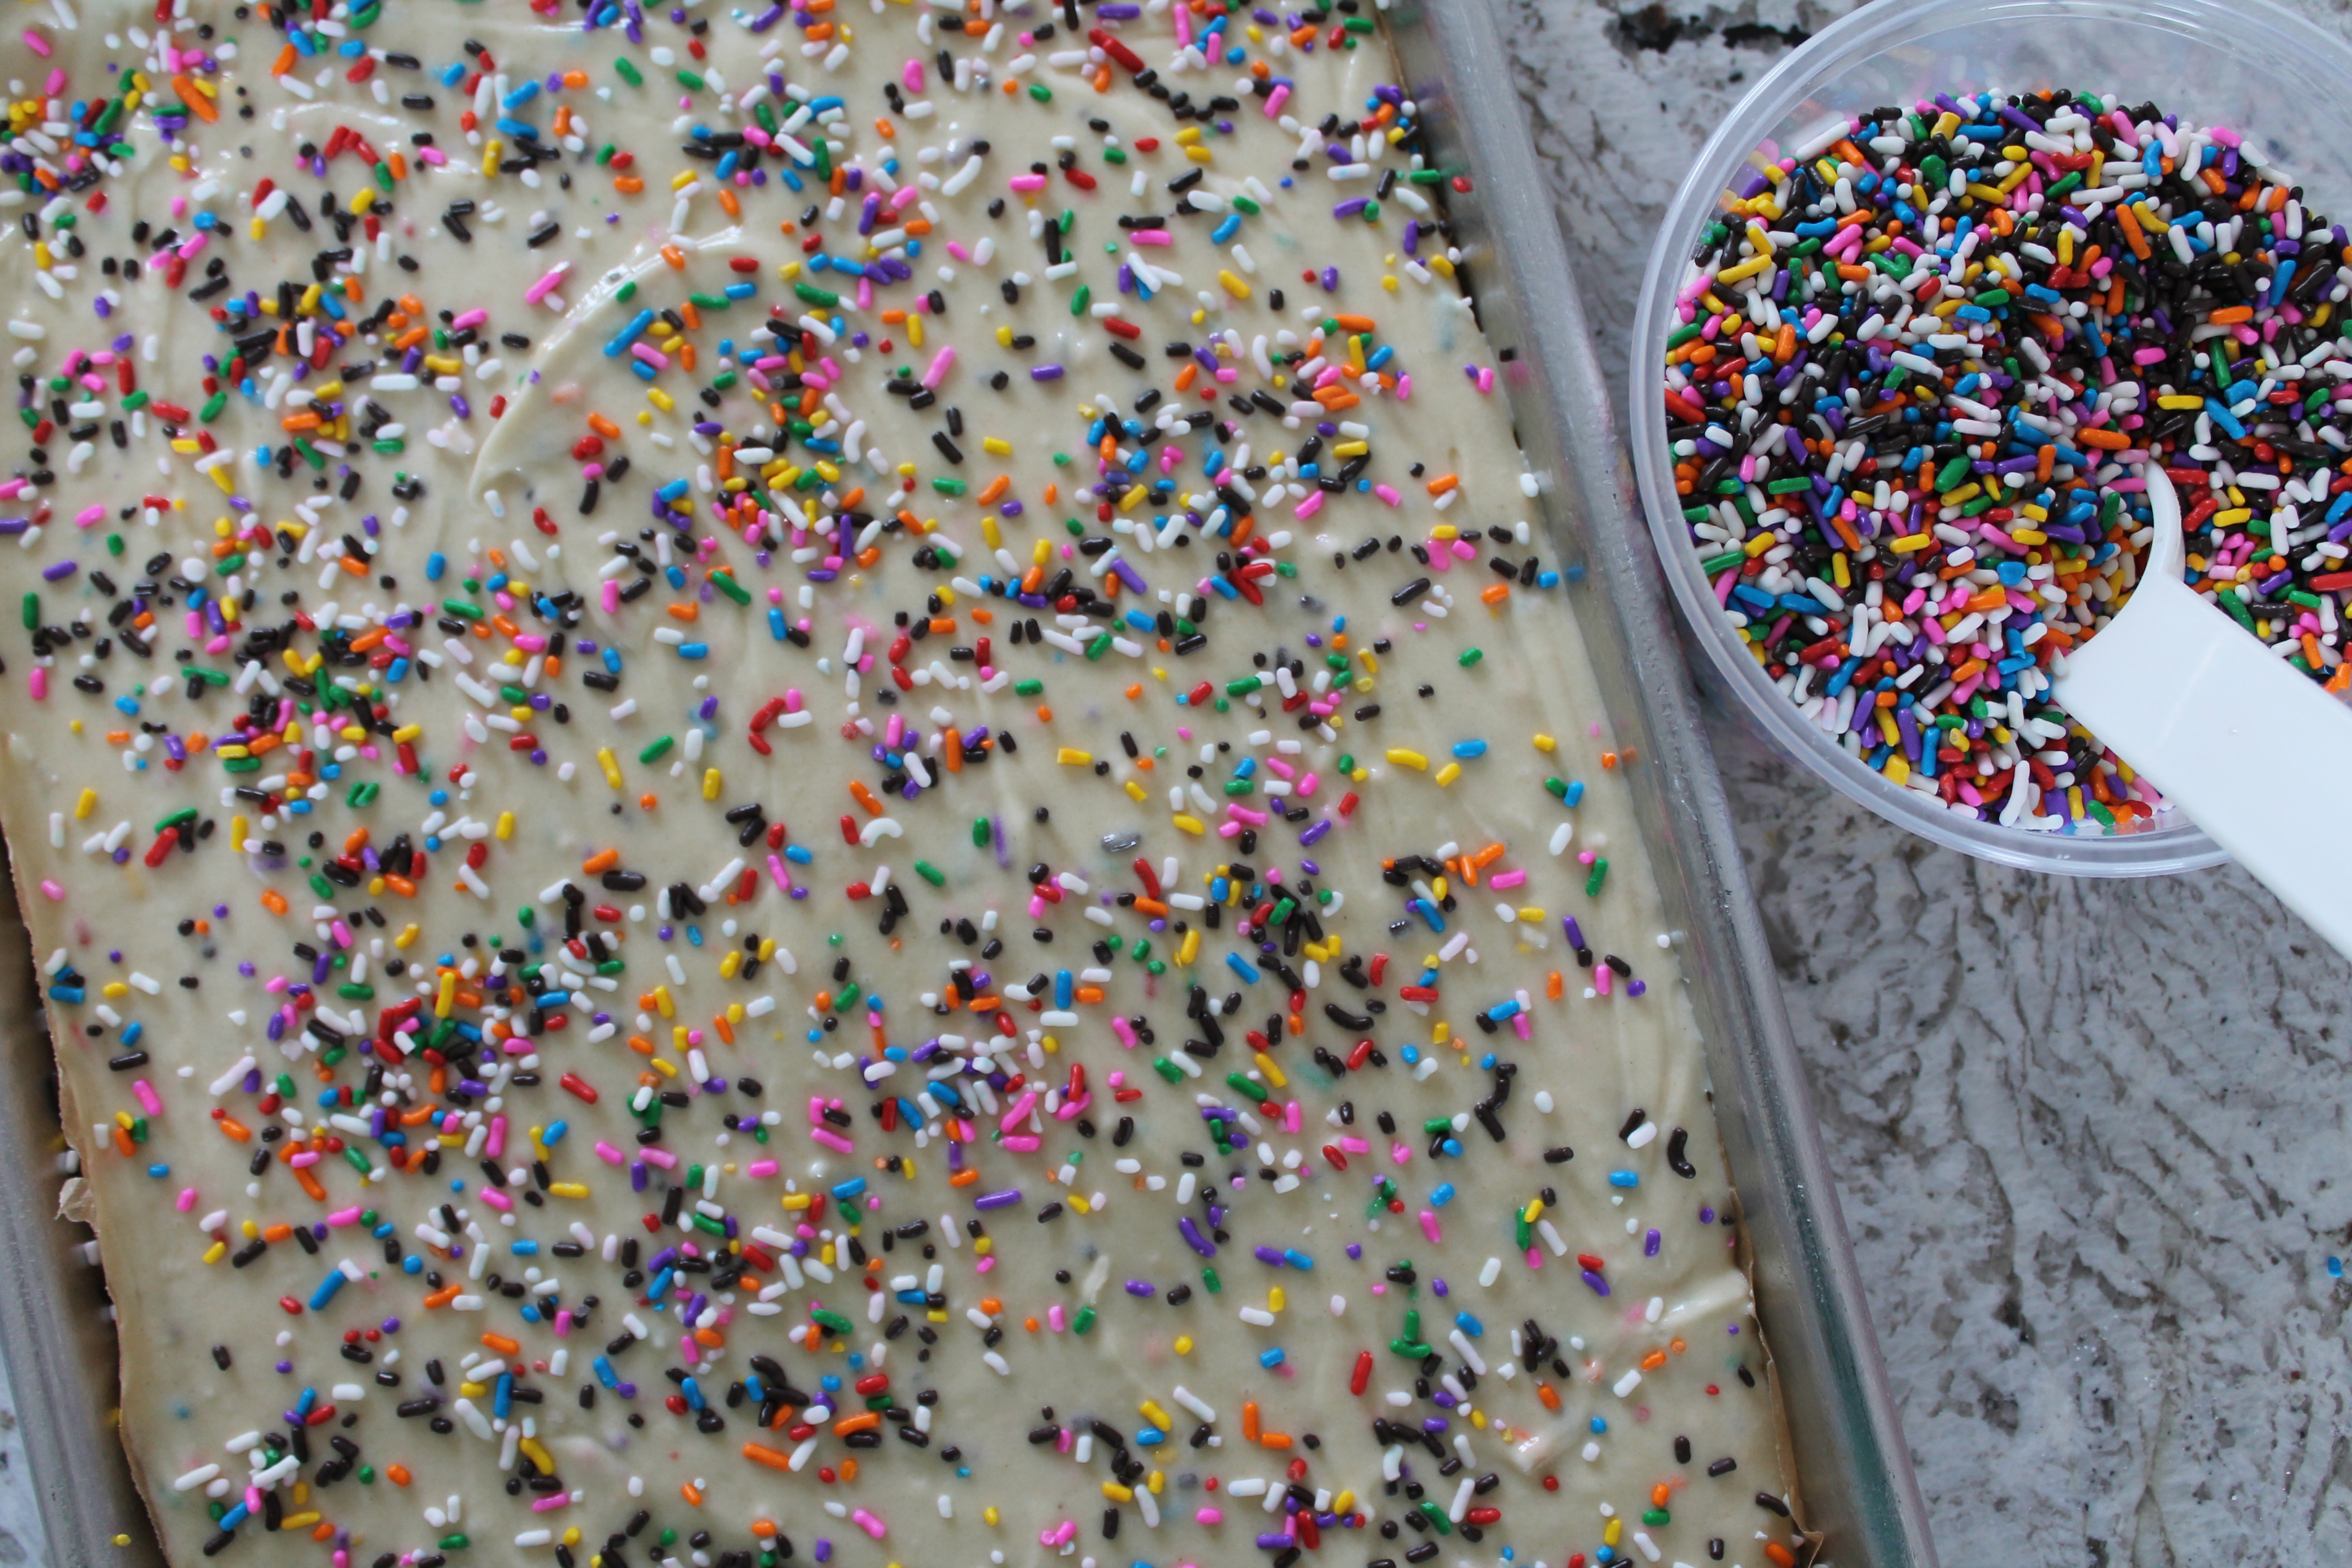
Now sprinkle the remaining 2 tbsp. sprinkles over the cake. This basically just results in a more evenly sprinkly cake: the cake will bake up around the sprinkles, and you will end up with sprinkles thrughout instead of sprinkles mostly on the bottom of the cake.
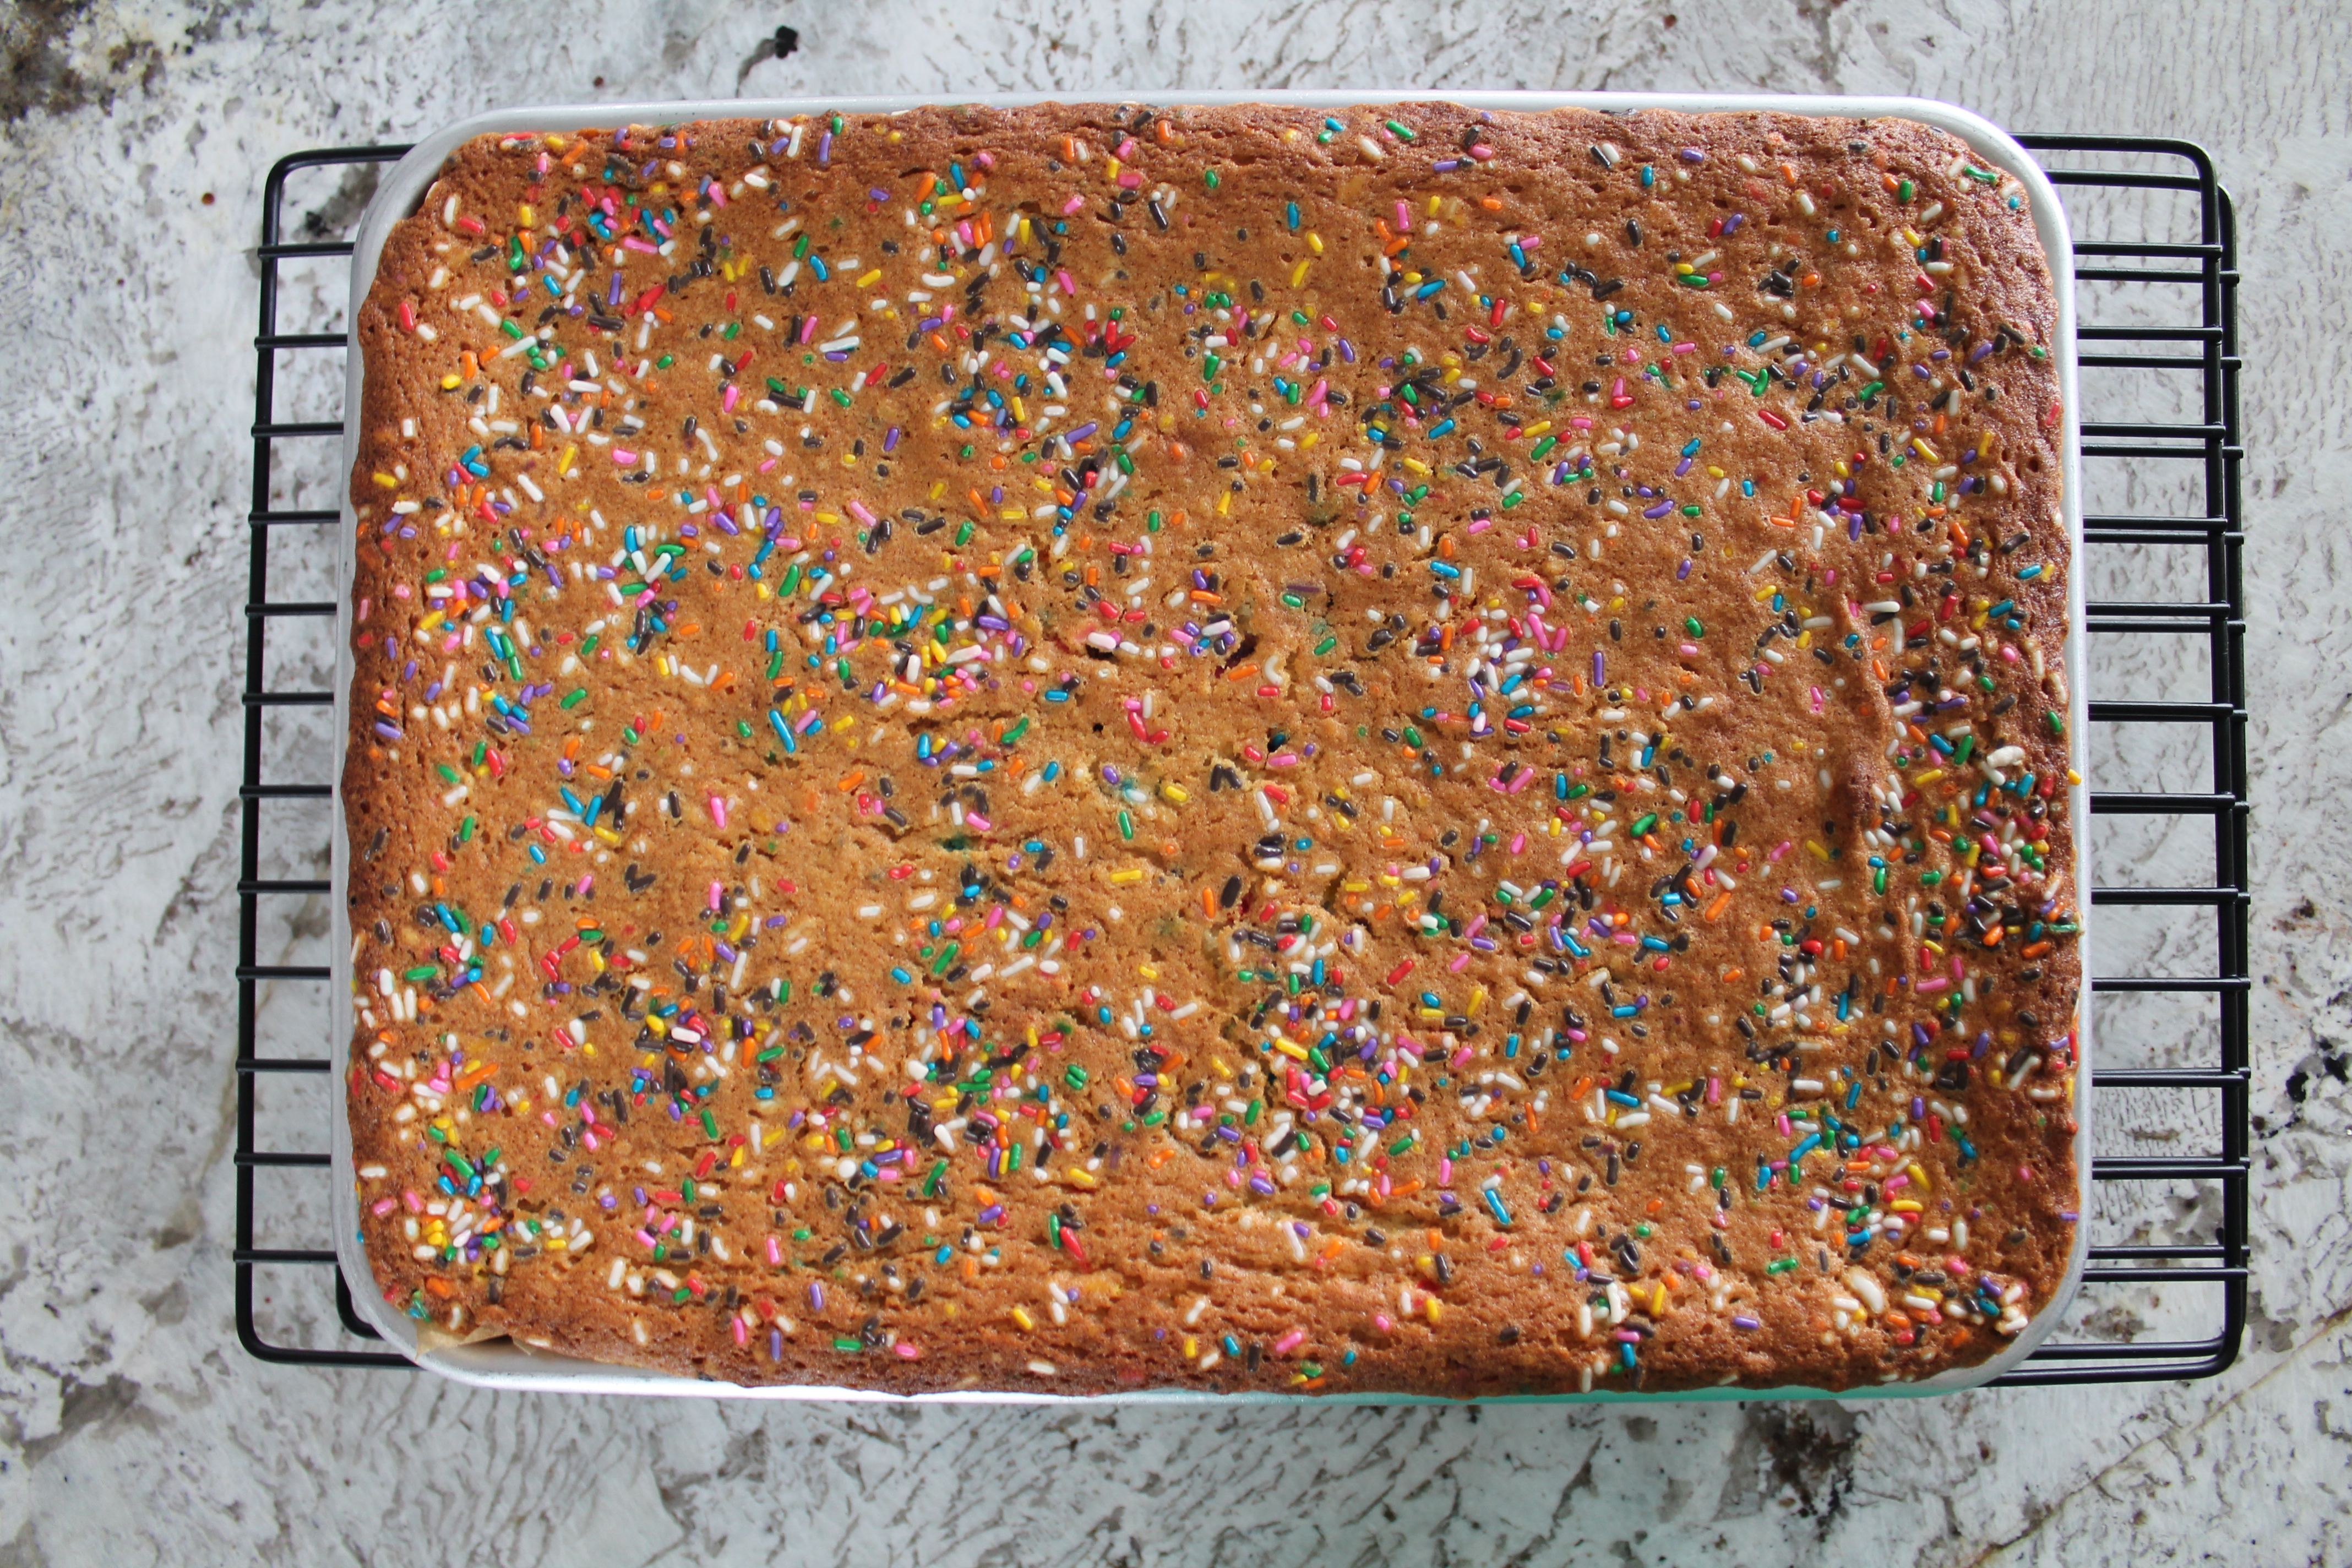 Bake your little rectangle of cake for 30–35 minutes, or until it springs back when lightly touched in the center. I actually found that this took 40 minutes. I was pretty worried that the edges of the cake would be too dry…but then I remembered that I was going to paint the cake with a milk soak, and I realized that the cake would end up moist no matter what! So do make sure the cake is completely well baked, even if the top starts to get a bit brown.
Let the cake cool completely. You can chill it in the fridge if you want to speed this process along.
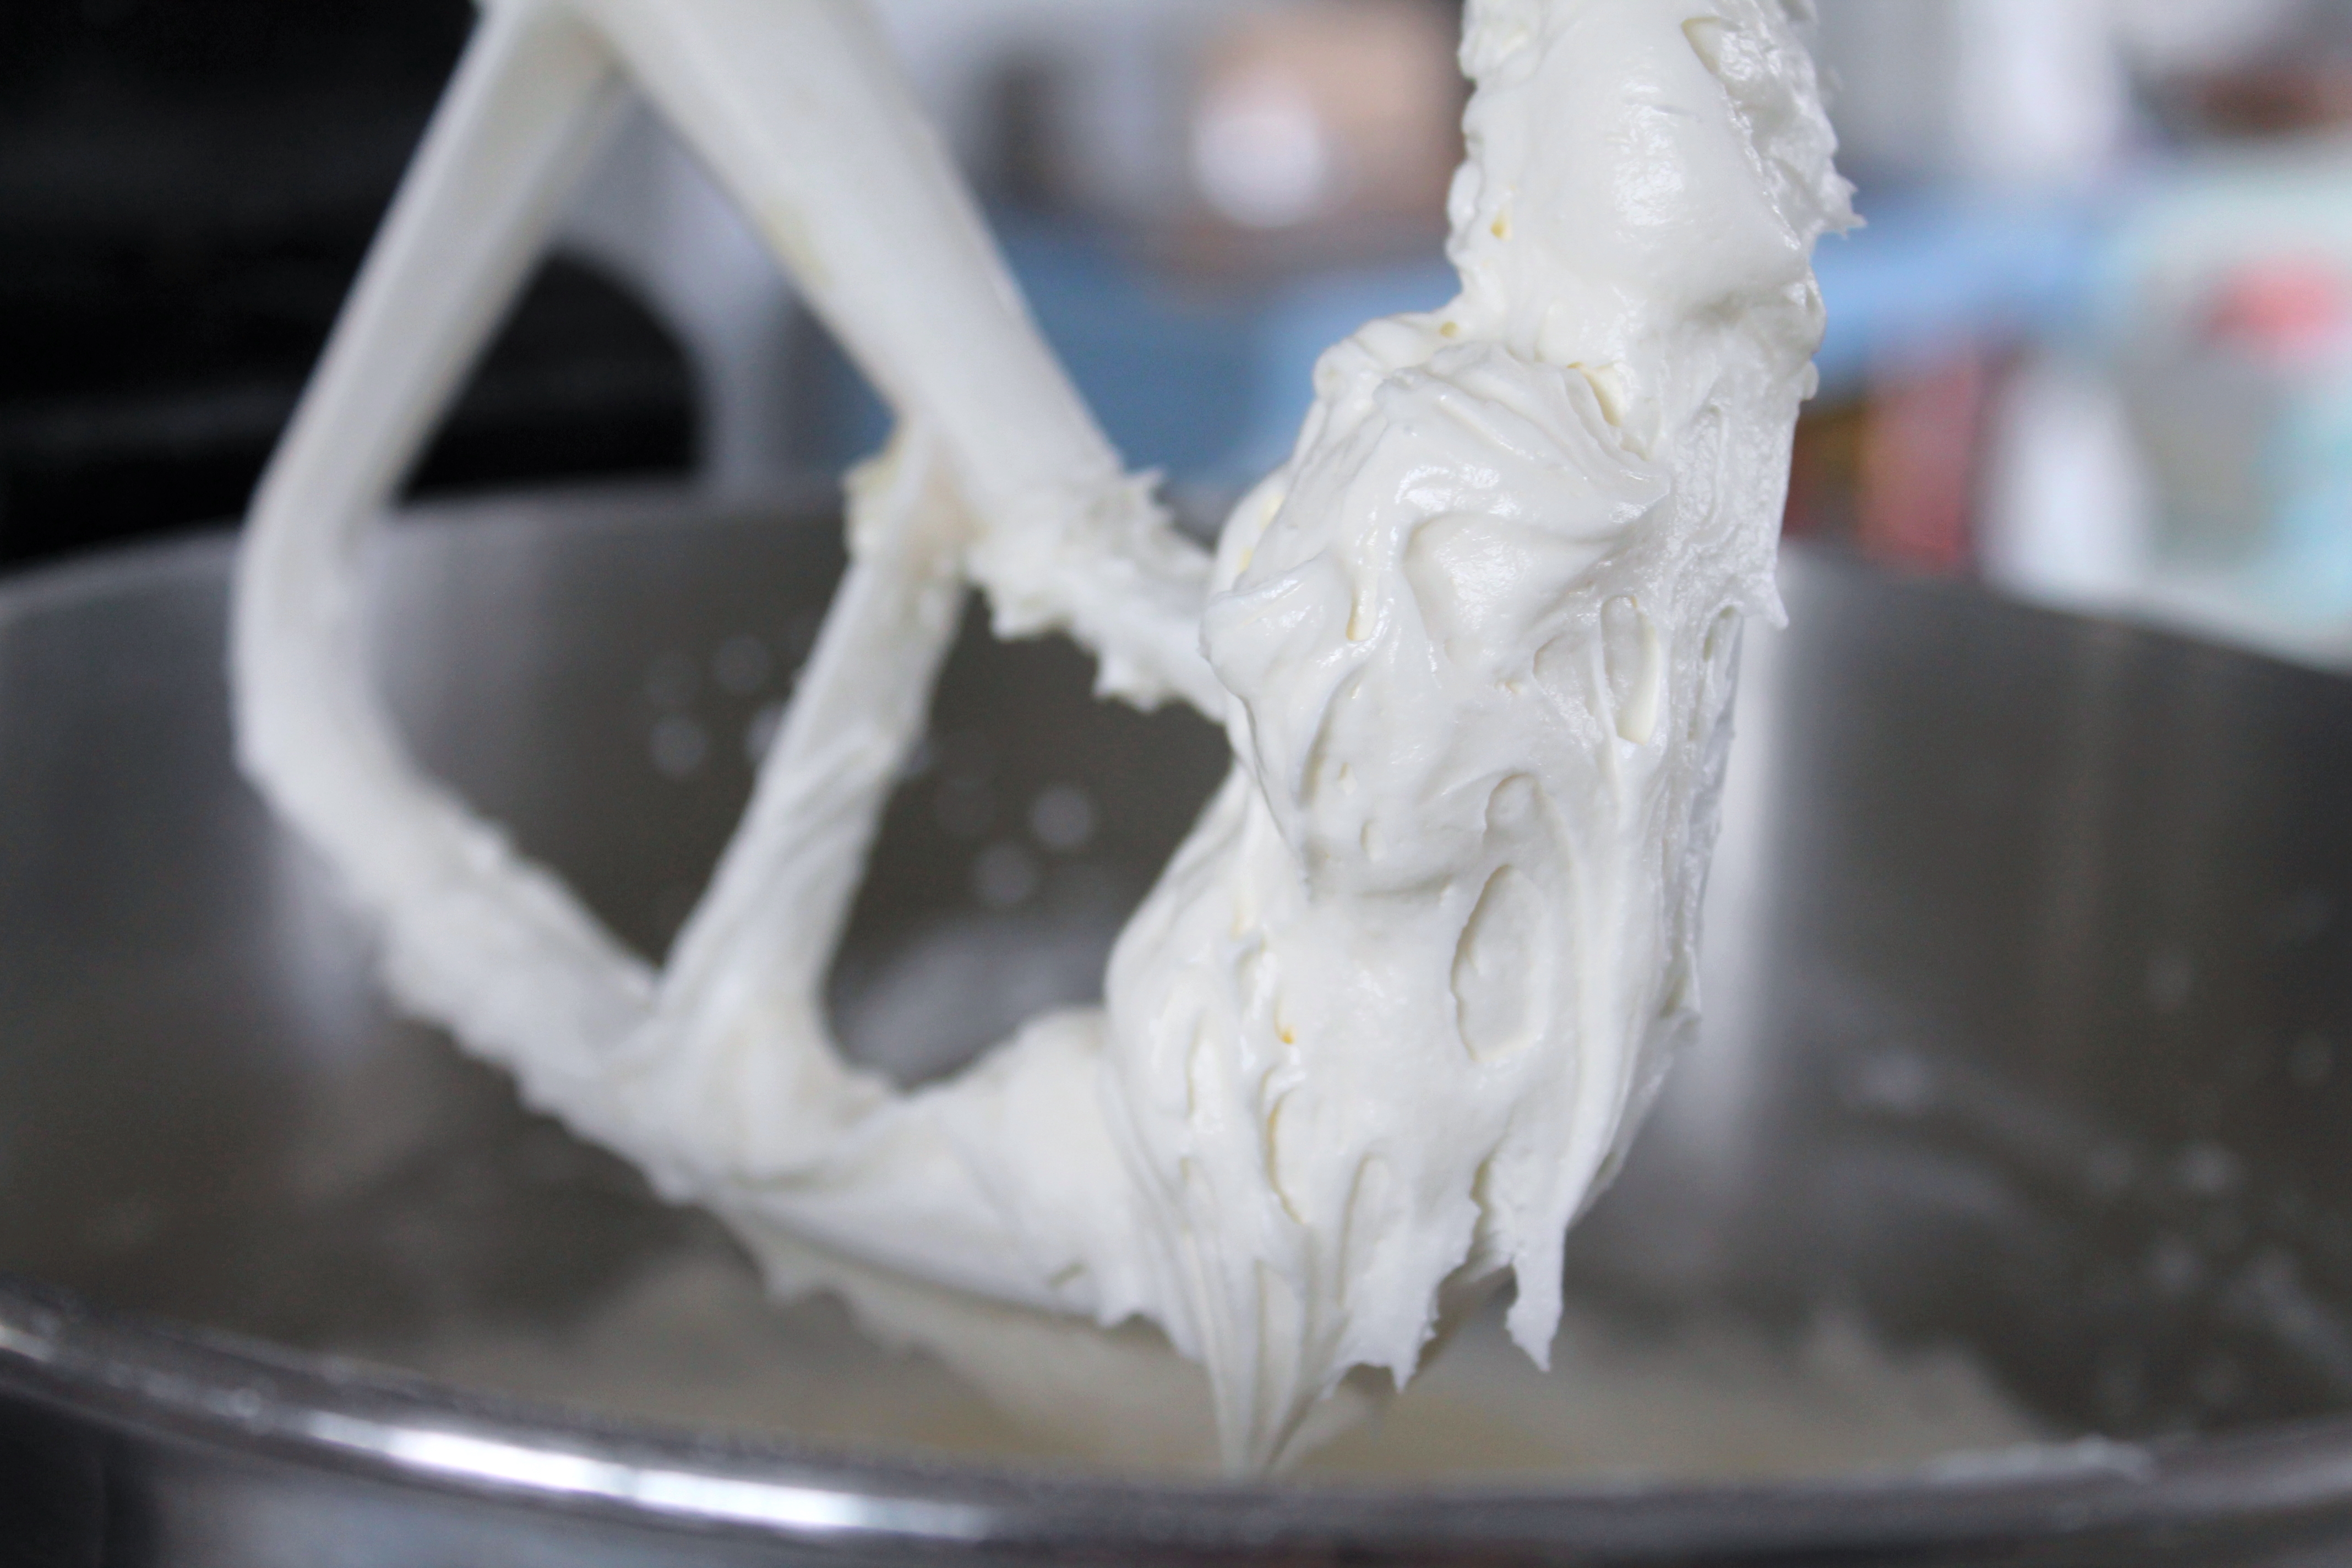 Now let’s make frosting. This frosting is a dream. I mean…I was so surprised by how excellent it was! I was originally sort of worried that it wouldn’t set well because of how little sugar it uses. And I was not a little bit concerned about using corn syrup and baking powder and citric acid in frosting. But….holy heck, this is good! And if you are ever looking to make a pure white frosting, this is the one.
Start by beating the vegetable shortening, butter, and cream cheese together. They should all start at room temperature so they will combine easily.
Add the corn syrup and vanilla. Christina Tosi’s original recipe called for glucose in addition to corn syrup; you can buy glucose at Michaels, but I opted for one less weird ingredient, since glucose and corn syrup are both a sticky, clear, sweet sludge.
Finally, add the confectioner’s sugar, baking powder, and citric acid. Citric acid is usually used for making cheese! The addition of citric acid here augments the flavor of the cream cheese and provides a beautiful tang against the sweet cookie crumbles. (P.S., citric acid is the magical reason that there are some “cream cheese” canned frostings that are actually vegan. Just saying.)
Beat until the frosting is creamy and snow white.
 Now. I hate to say this, since we have already made three things…but you’ve done the easy part!
Okay, I suppose assembling the cake isn’t challenging in terms of skills, but it is time-consuming and rather irritating. Just hang in there…the result is so beautiful!
First of all, you need to have a 6″ cake ring. That’s basically a 3″ tall metal circle that you are going to use to cut the small sheet cake into rounds. I bought mine at a local cake supply shop, but you could also just look on Amazon. You also need to build a tall circle that fits just inside the cake ring: this is what you will use to assemble the cake. I actually built mine out of a double layer of parchment paper, but the ideal material would be acetate (and this is what Christina Tosi recommends).
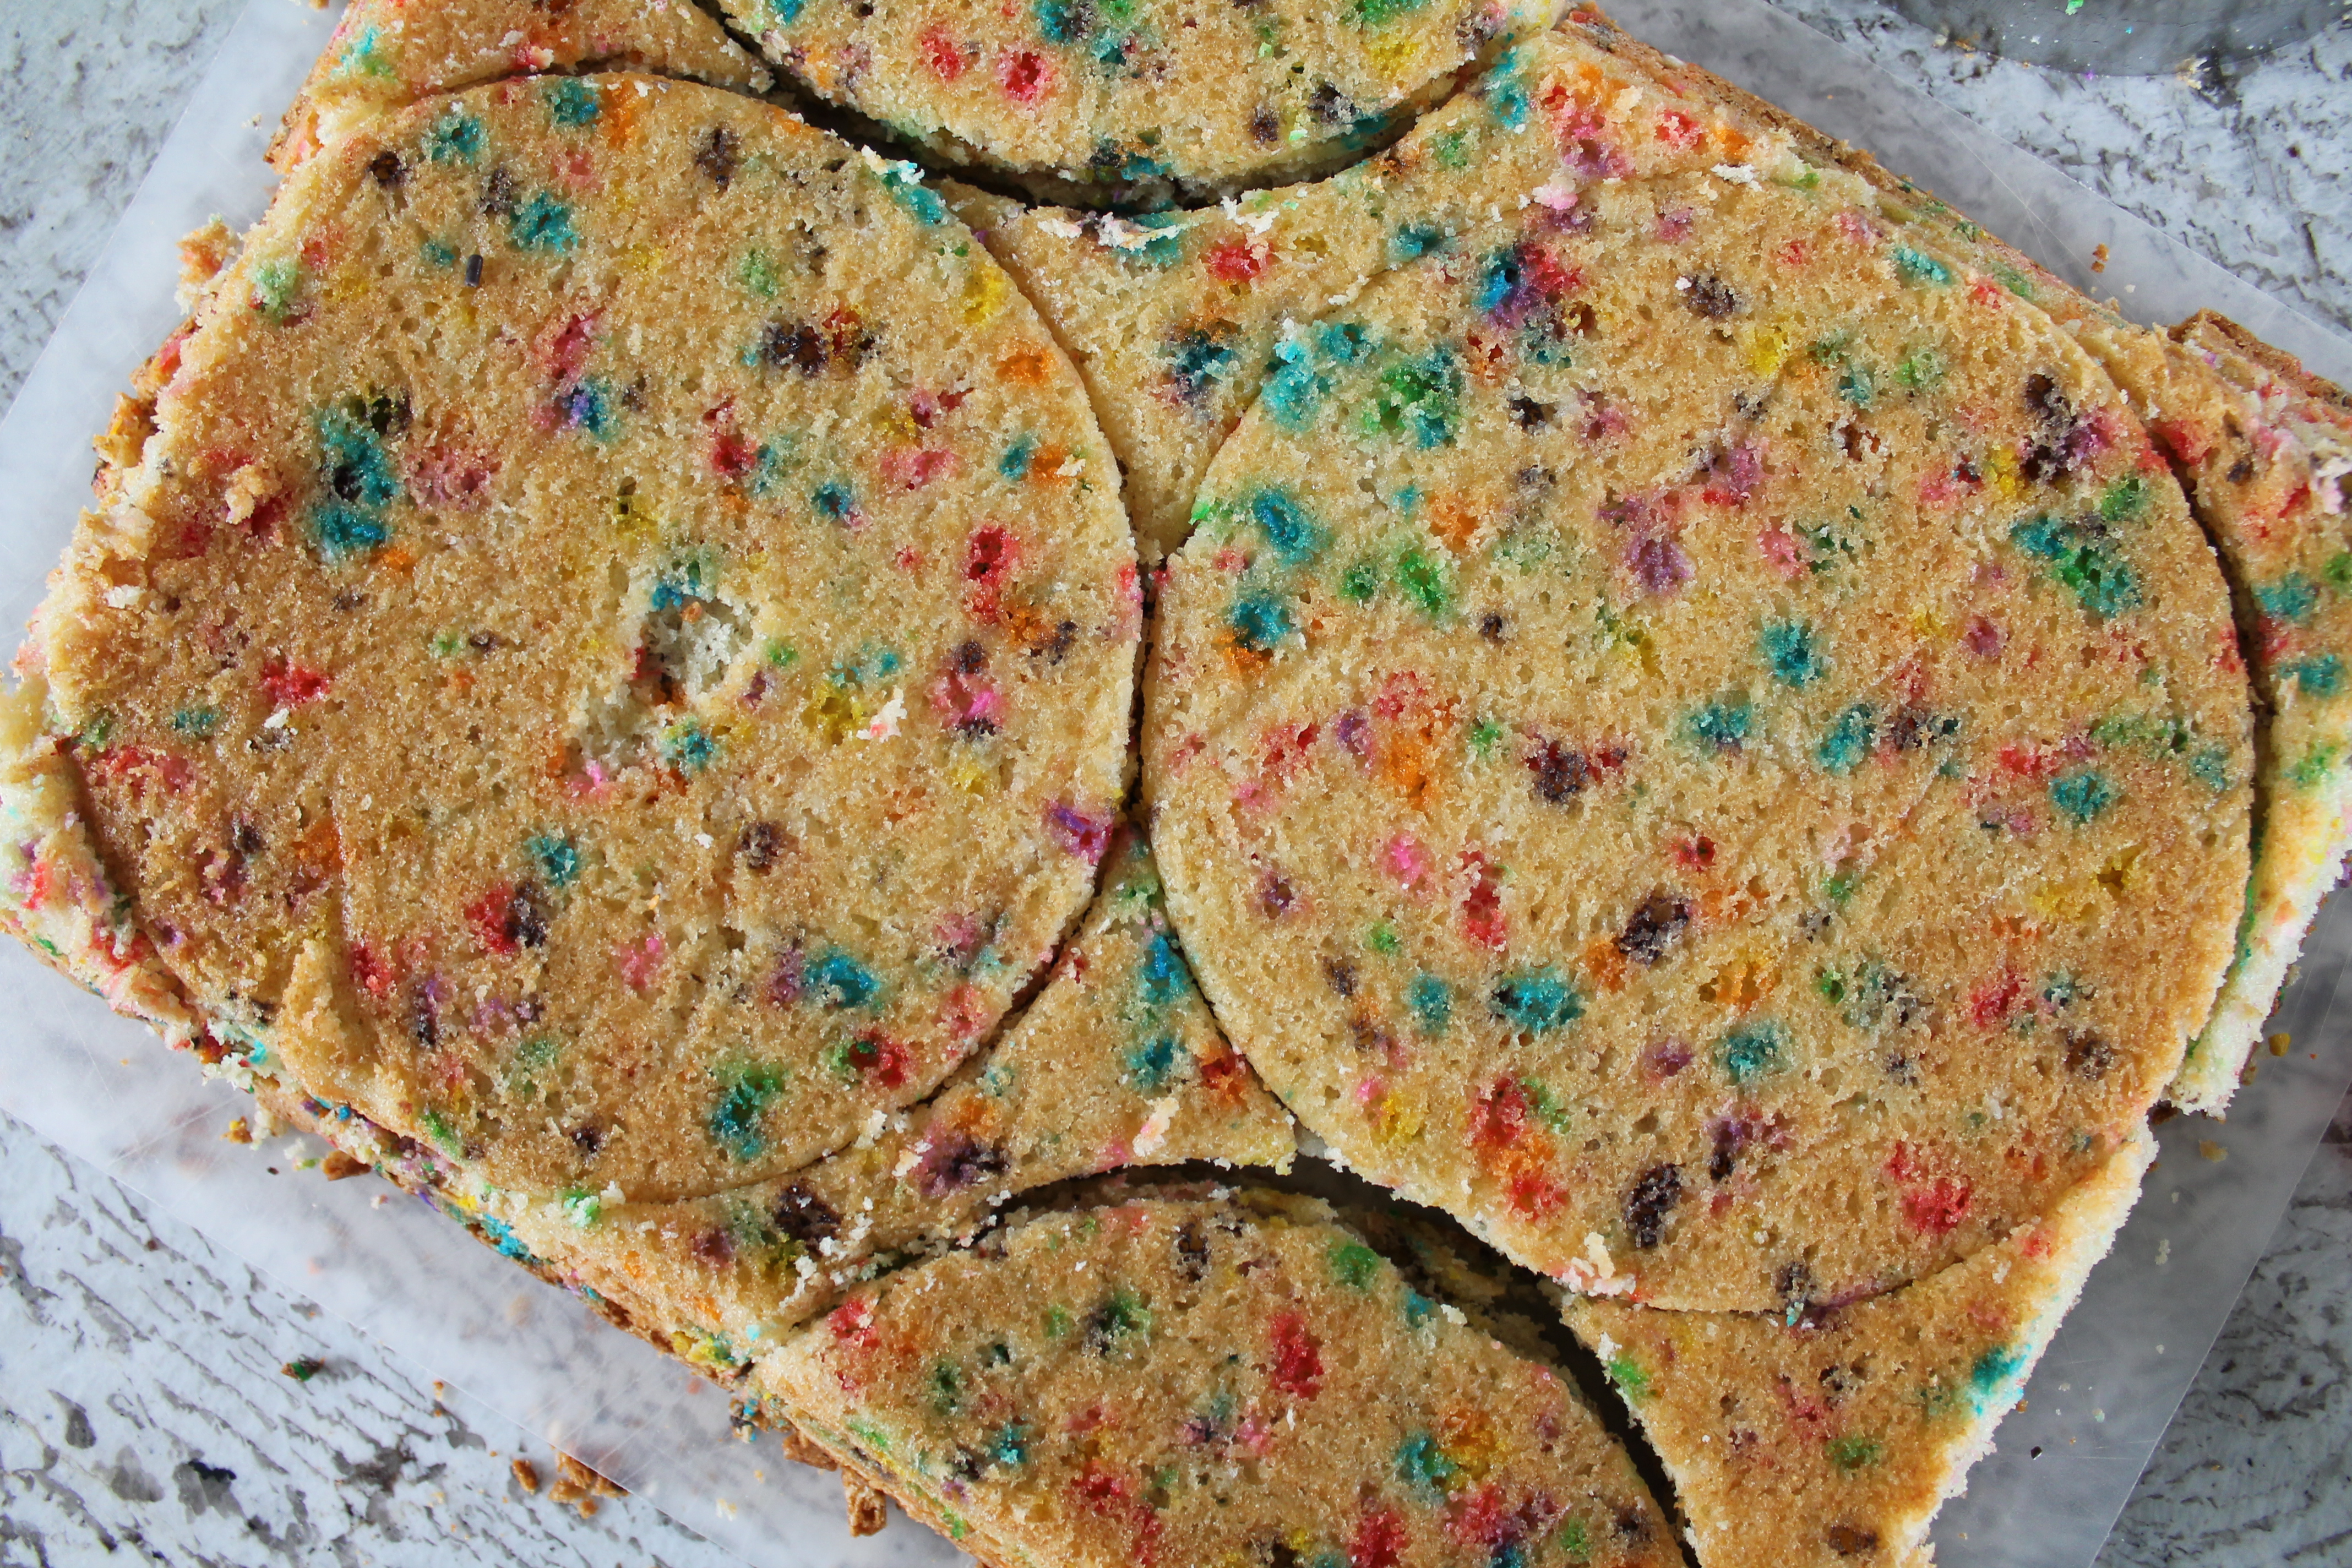 Turn the cooled cake out of the baking sheet. Cut two 6″ circles from the cake, then cut two semi-circles from the edges.
Place the cake ring on a layer of foil or parchment, so it will be easy to move the cake later. Line the inside of the cake ring with the acetate (or parchment paper) cylinder, which should be 6″ diameter and about 9″ tall.
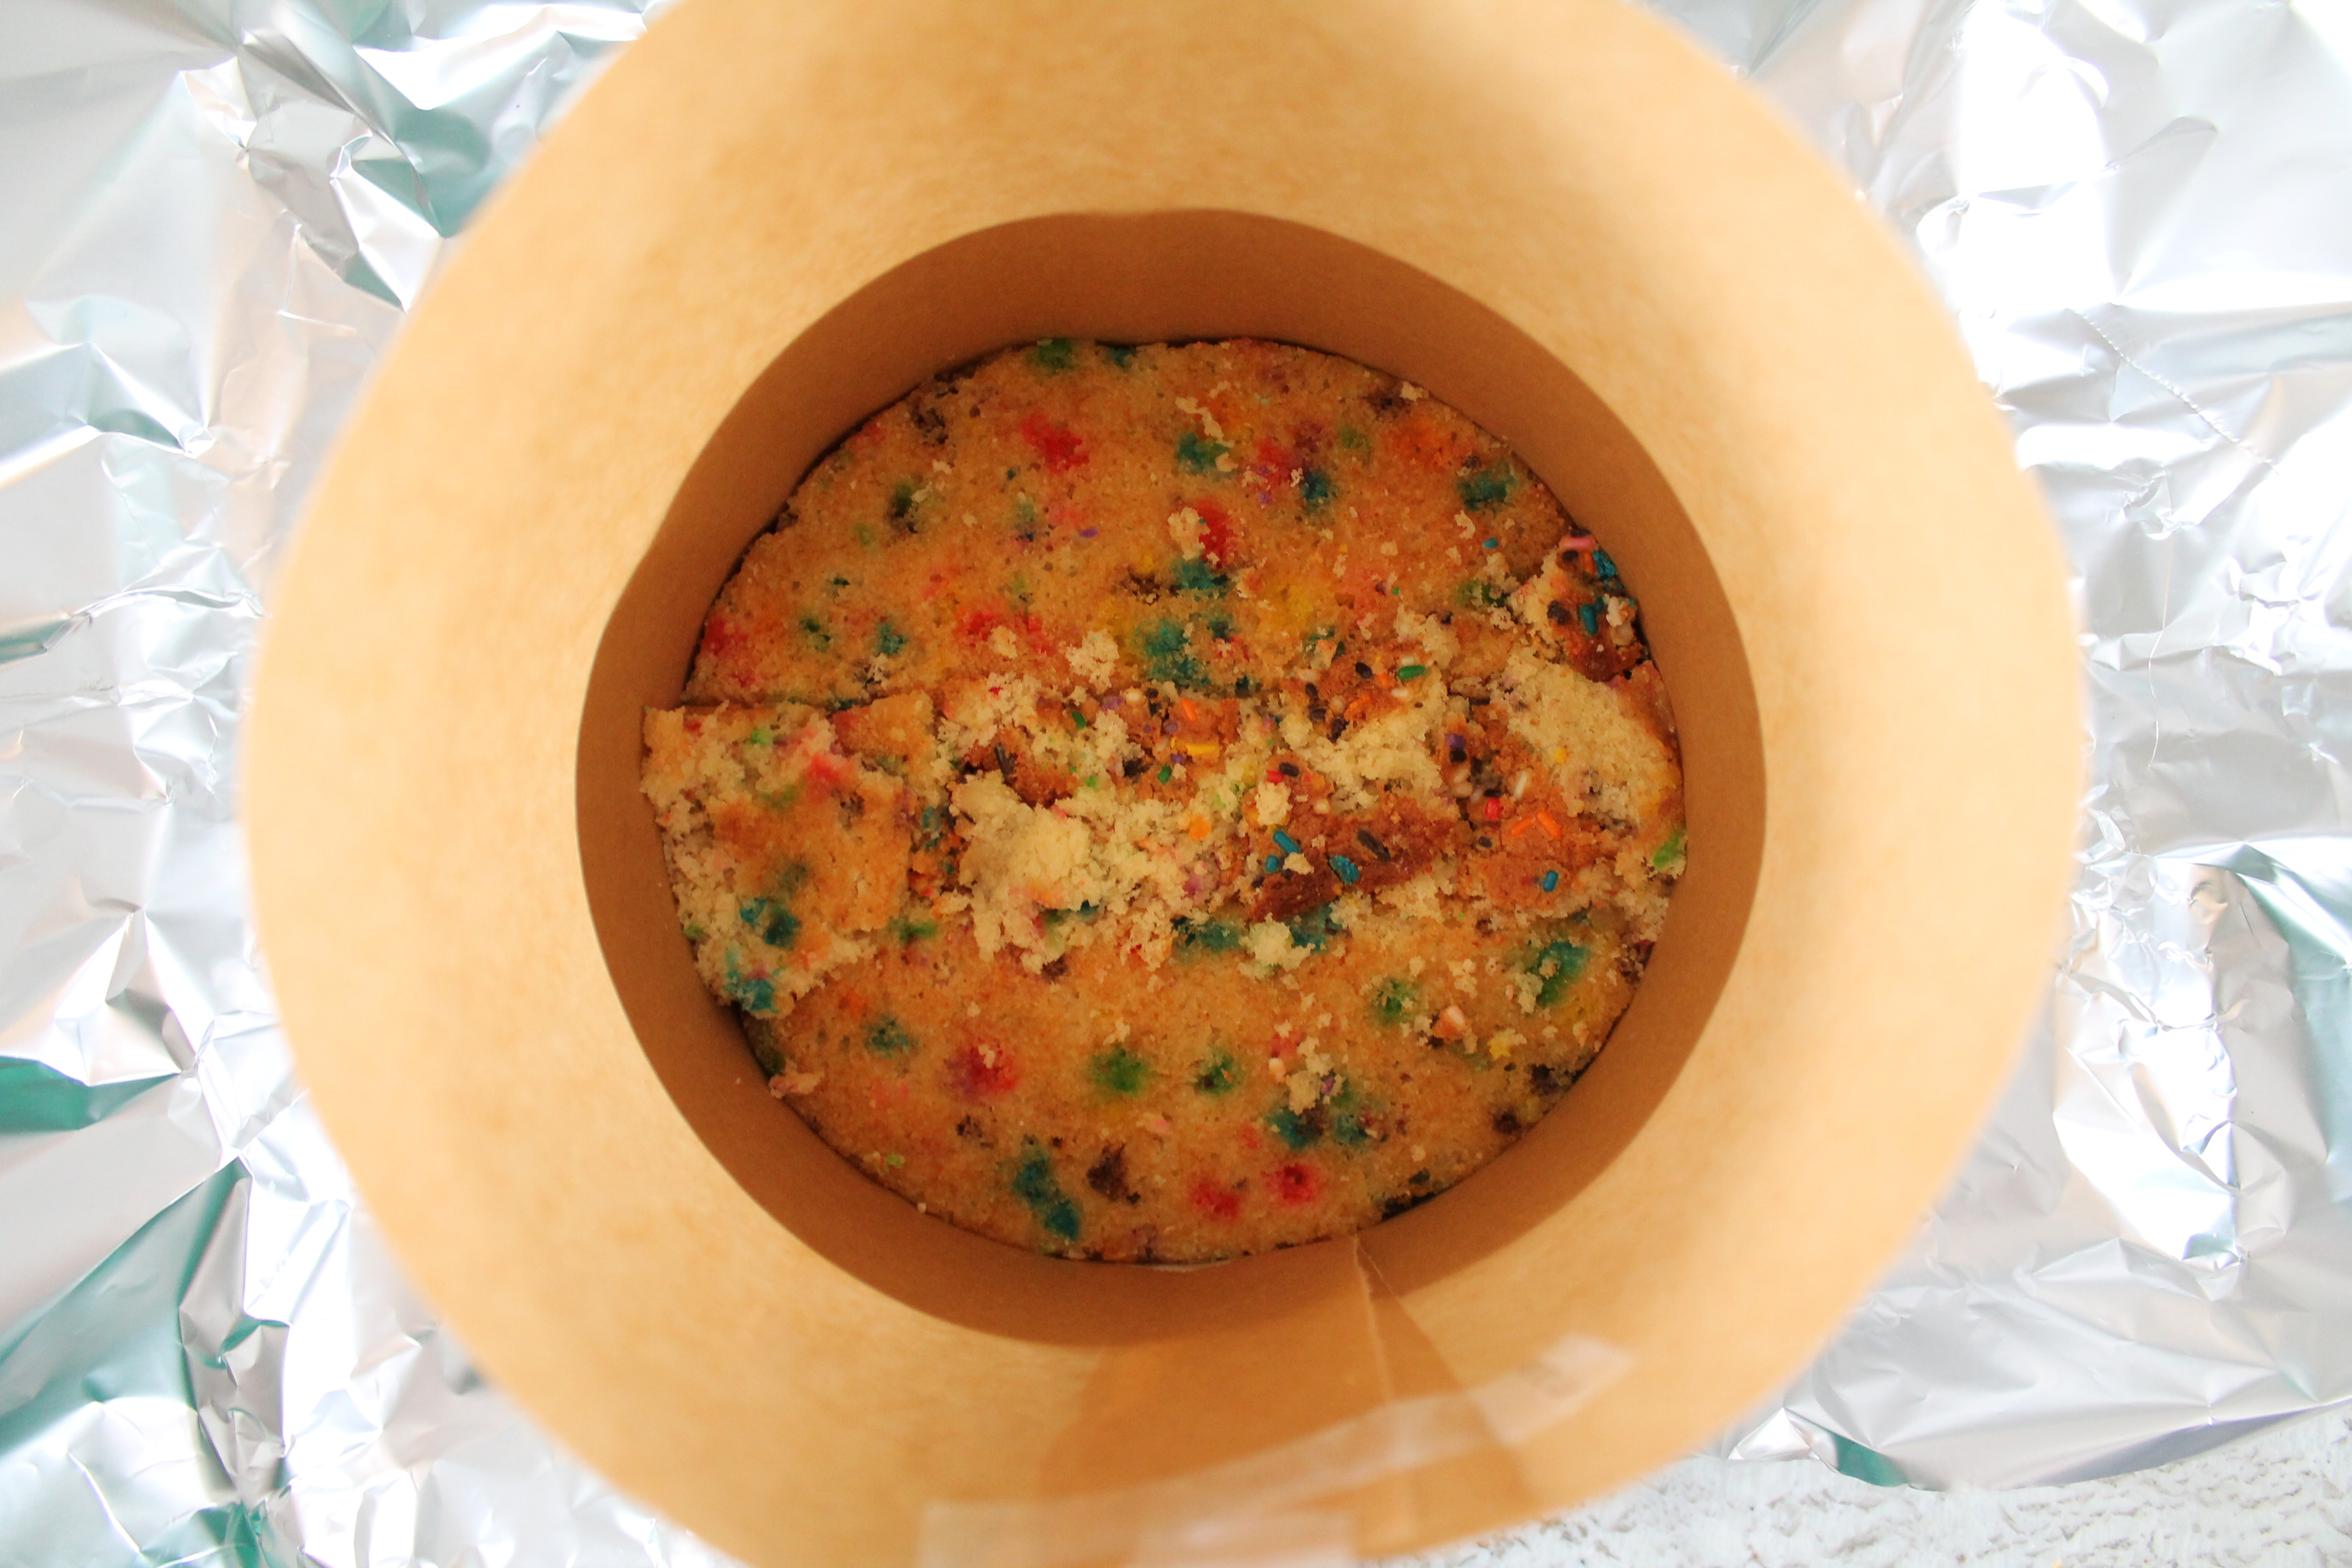 Place the two semicircles of cake in the base of the cake ring. Fill in the center with crumbs and pieces from the sheet cake, anything that is not part of the other two cut circles. Feel free to add extra cake crumbs the top, not just down the center! I tried to avoid the crispier edge pieces for the assembly (and yes, I ate them instead).
 Now stir together the cake soak, which is just milk and vanilla. Paint about half of the soak over the frankenstein cake layer, to help it hold together and to give it more moisture.
 Next we start in on the crazy, irritating steps.
Divide the frosting into five equal amounts. Each of the five amounts will be somewhere between 3-4 tbsp.
Frost the bottom frankencake with one of the five blobs of frosting. Yes…this is challenging, given that the cake is basically made out of crumbs. Stick with it and use a small spatula.
 Next, drop about a third of the cookie crumbs over the frosting. Sarah and I used ⅔ cup, and we did ultimately end up with about ¼ cup crumbs left over, but I actually felt like there was a perfect amount of crunch, and I wouldn’t have wanted to cake to turn out any sweeter. So…either divide the crumbs into equal thirds, or just use ⅔ all the way. Your choice.
Now take the next fifth of frosting and spread it over and around the cookie crumbs.
Oh my gosh, what a ridiculously irritating endeavor.
Round about this point, you may be asking yourself, “Why didn’t I just take two-fifths of the frosting, mix in the cookie crumbs, and spread that on the cake??” So I will tell you: that is a perfectly valid strategy for frosting this naked cake! In fact, that’s exactly what I did for the middle layer of frosting in these photos, just to test it out. It’s a thousand times less frustrating, and the taste and textural result is nearly identical. However, it will not be as beautiful as the layering method.
If you mix the crumbs into the frosting directly, the frosting will turn a bit crumby with tiny fragments of cookie. This doesn’t matter in the center, but around the edges, you will not be able to achieve the same smooth, white layer, and there will probably be some gaps between cookie crumbs, which means that the frosting won’t appear fully filled in. What I recommend, if you decide to go the mixing route, is to save about 1 tbsp. frosting to fill in any holes once you unmask the cake.
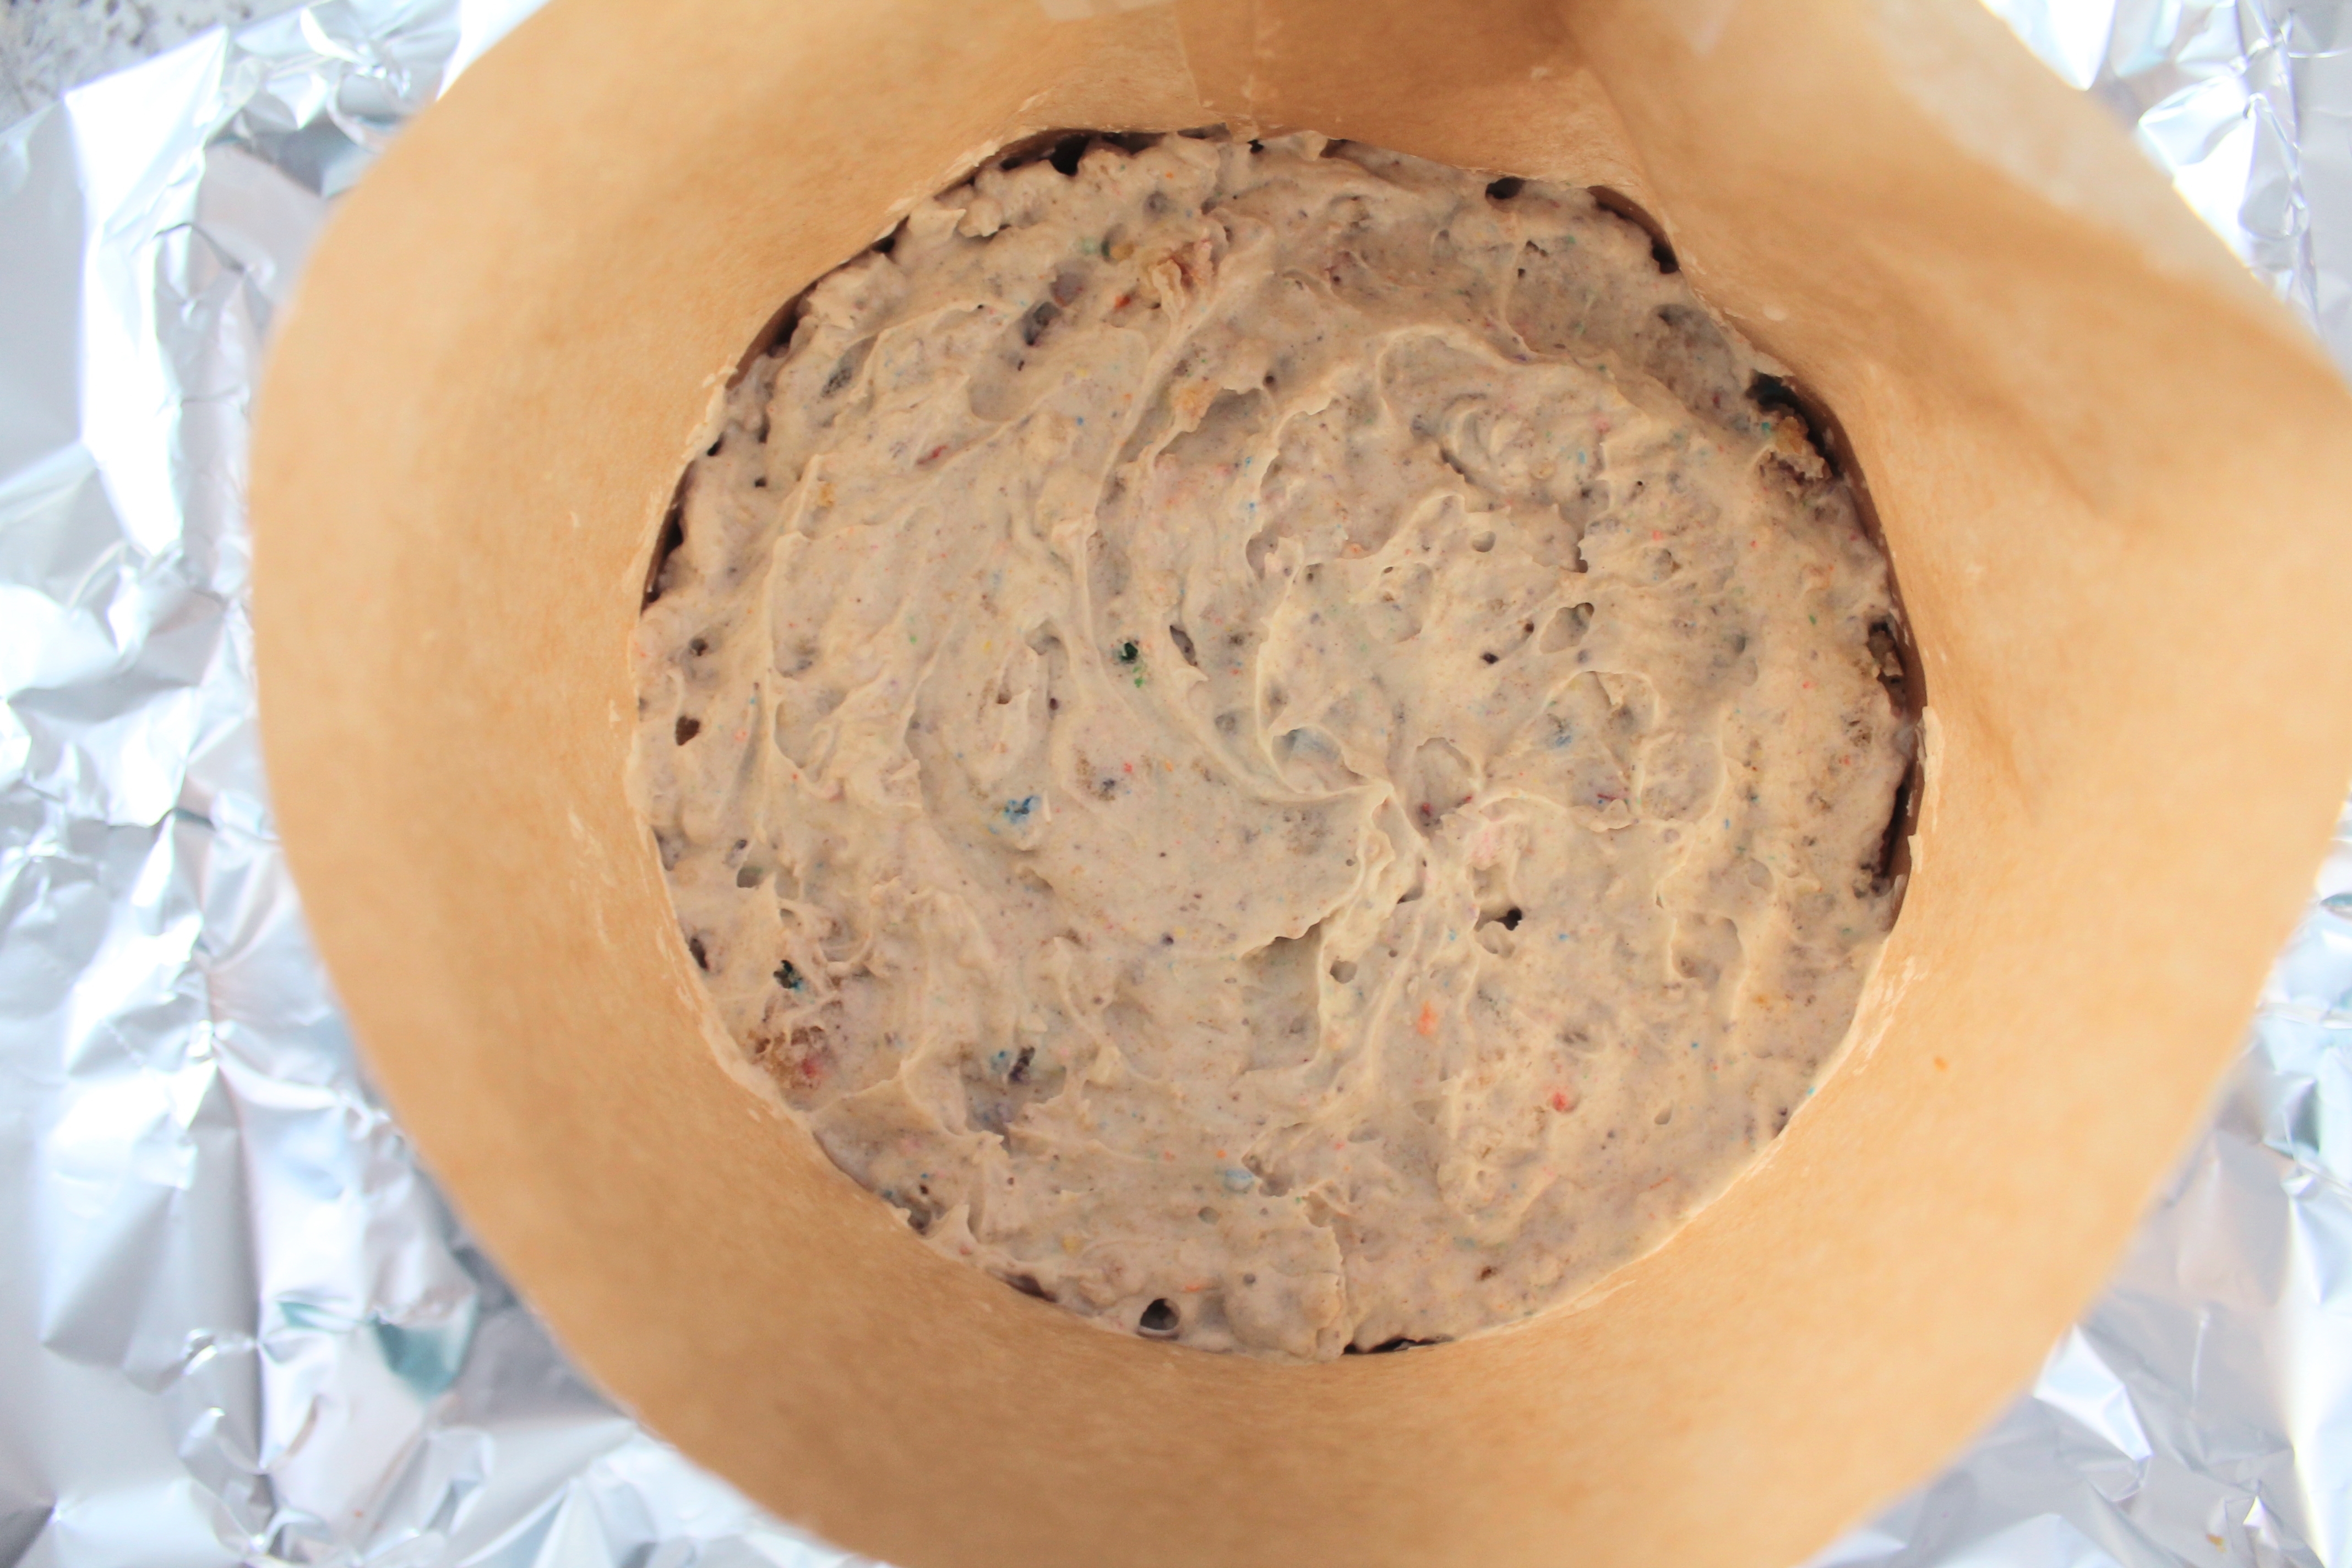
Okay. Back to reality. Once you have achieved frosting-cookies-frosting over the base of the cake, it’s time to repeat! Gently push one of the cake circles down into the ring. It’s good to use whichever one is less beautiful for the middle layer. Brush it with all of the remaining milk soak (yes, the top layer of cake doesn’t get soaked). Frosting-cookies-frosting.
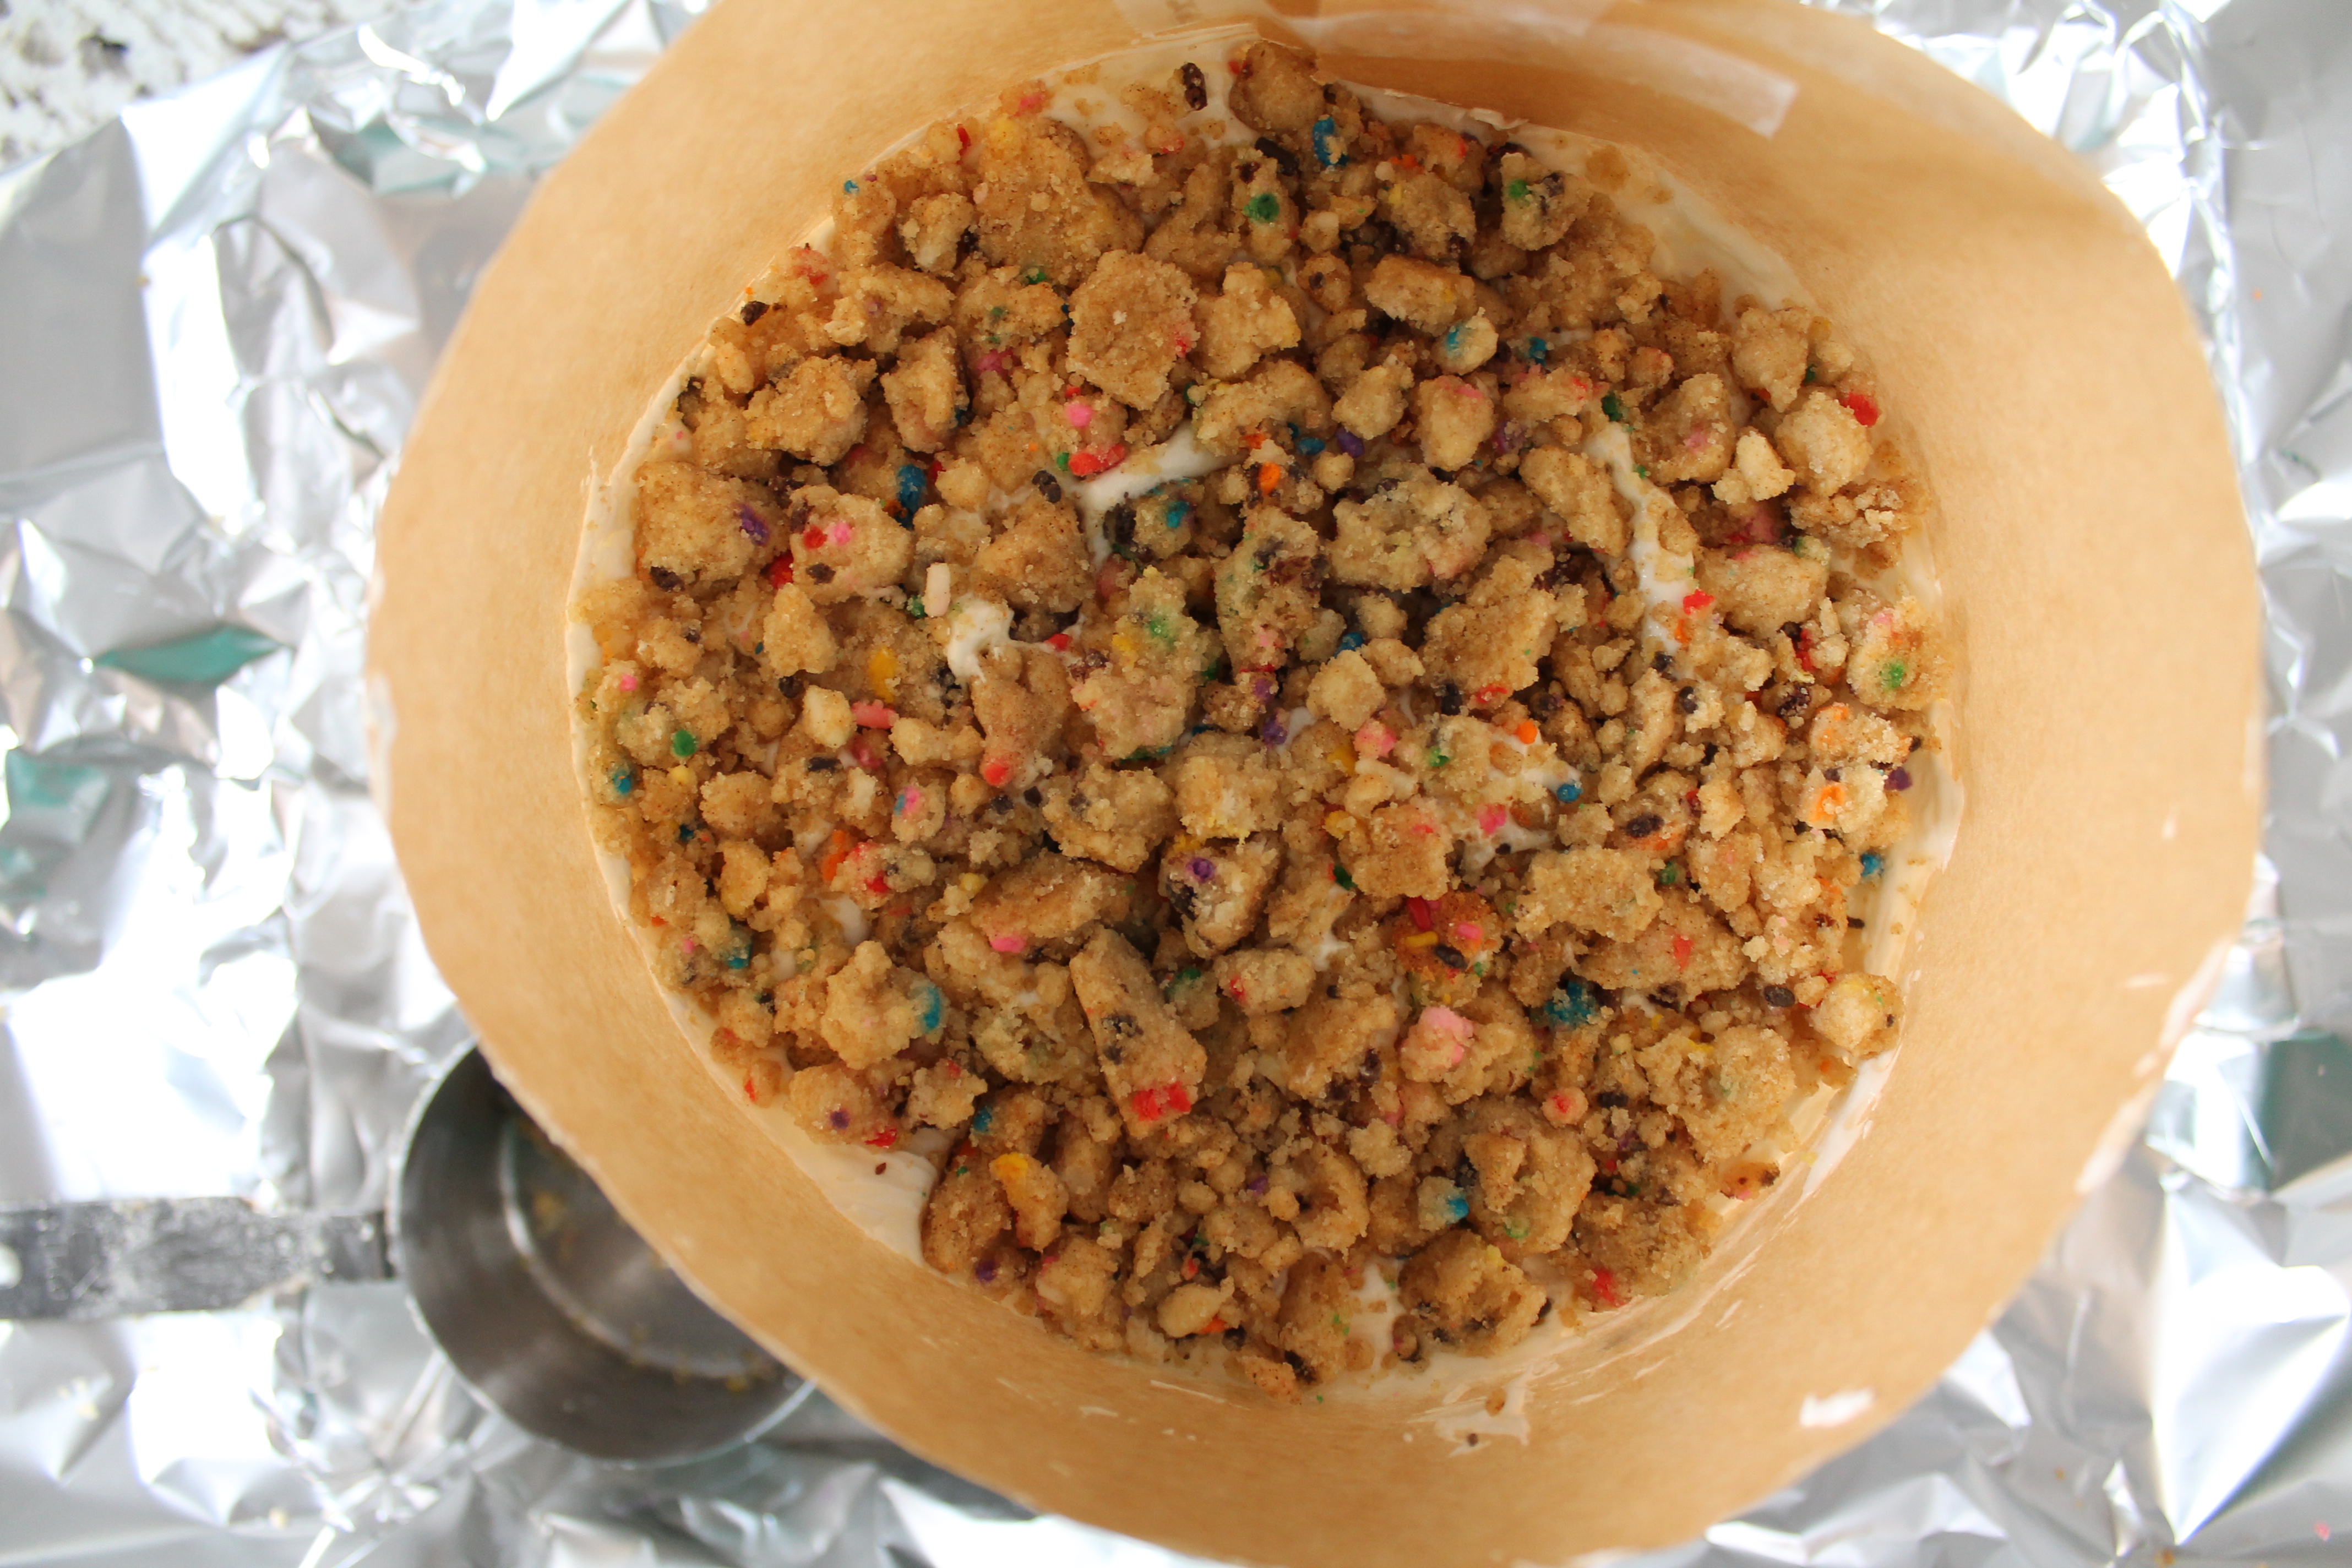
Push the top layer of cake into the mold (at this point, you will be in acetate/parchment territory). Frost it with the remaining frosting, then drop the last ⅔ cup cookie crumbles neatly over top.
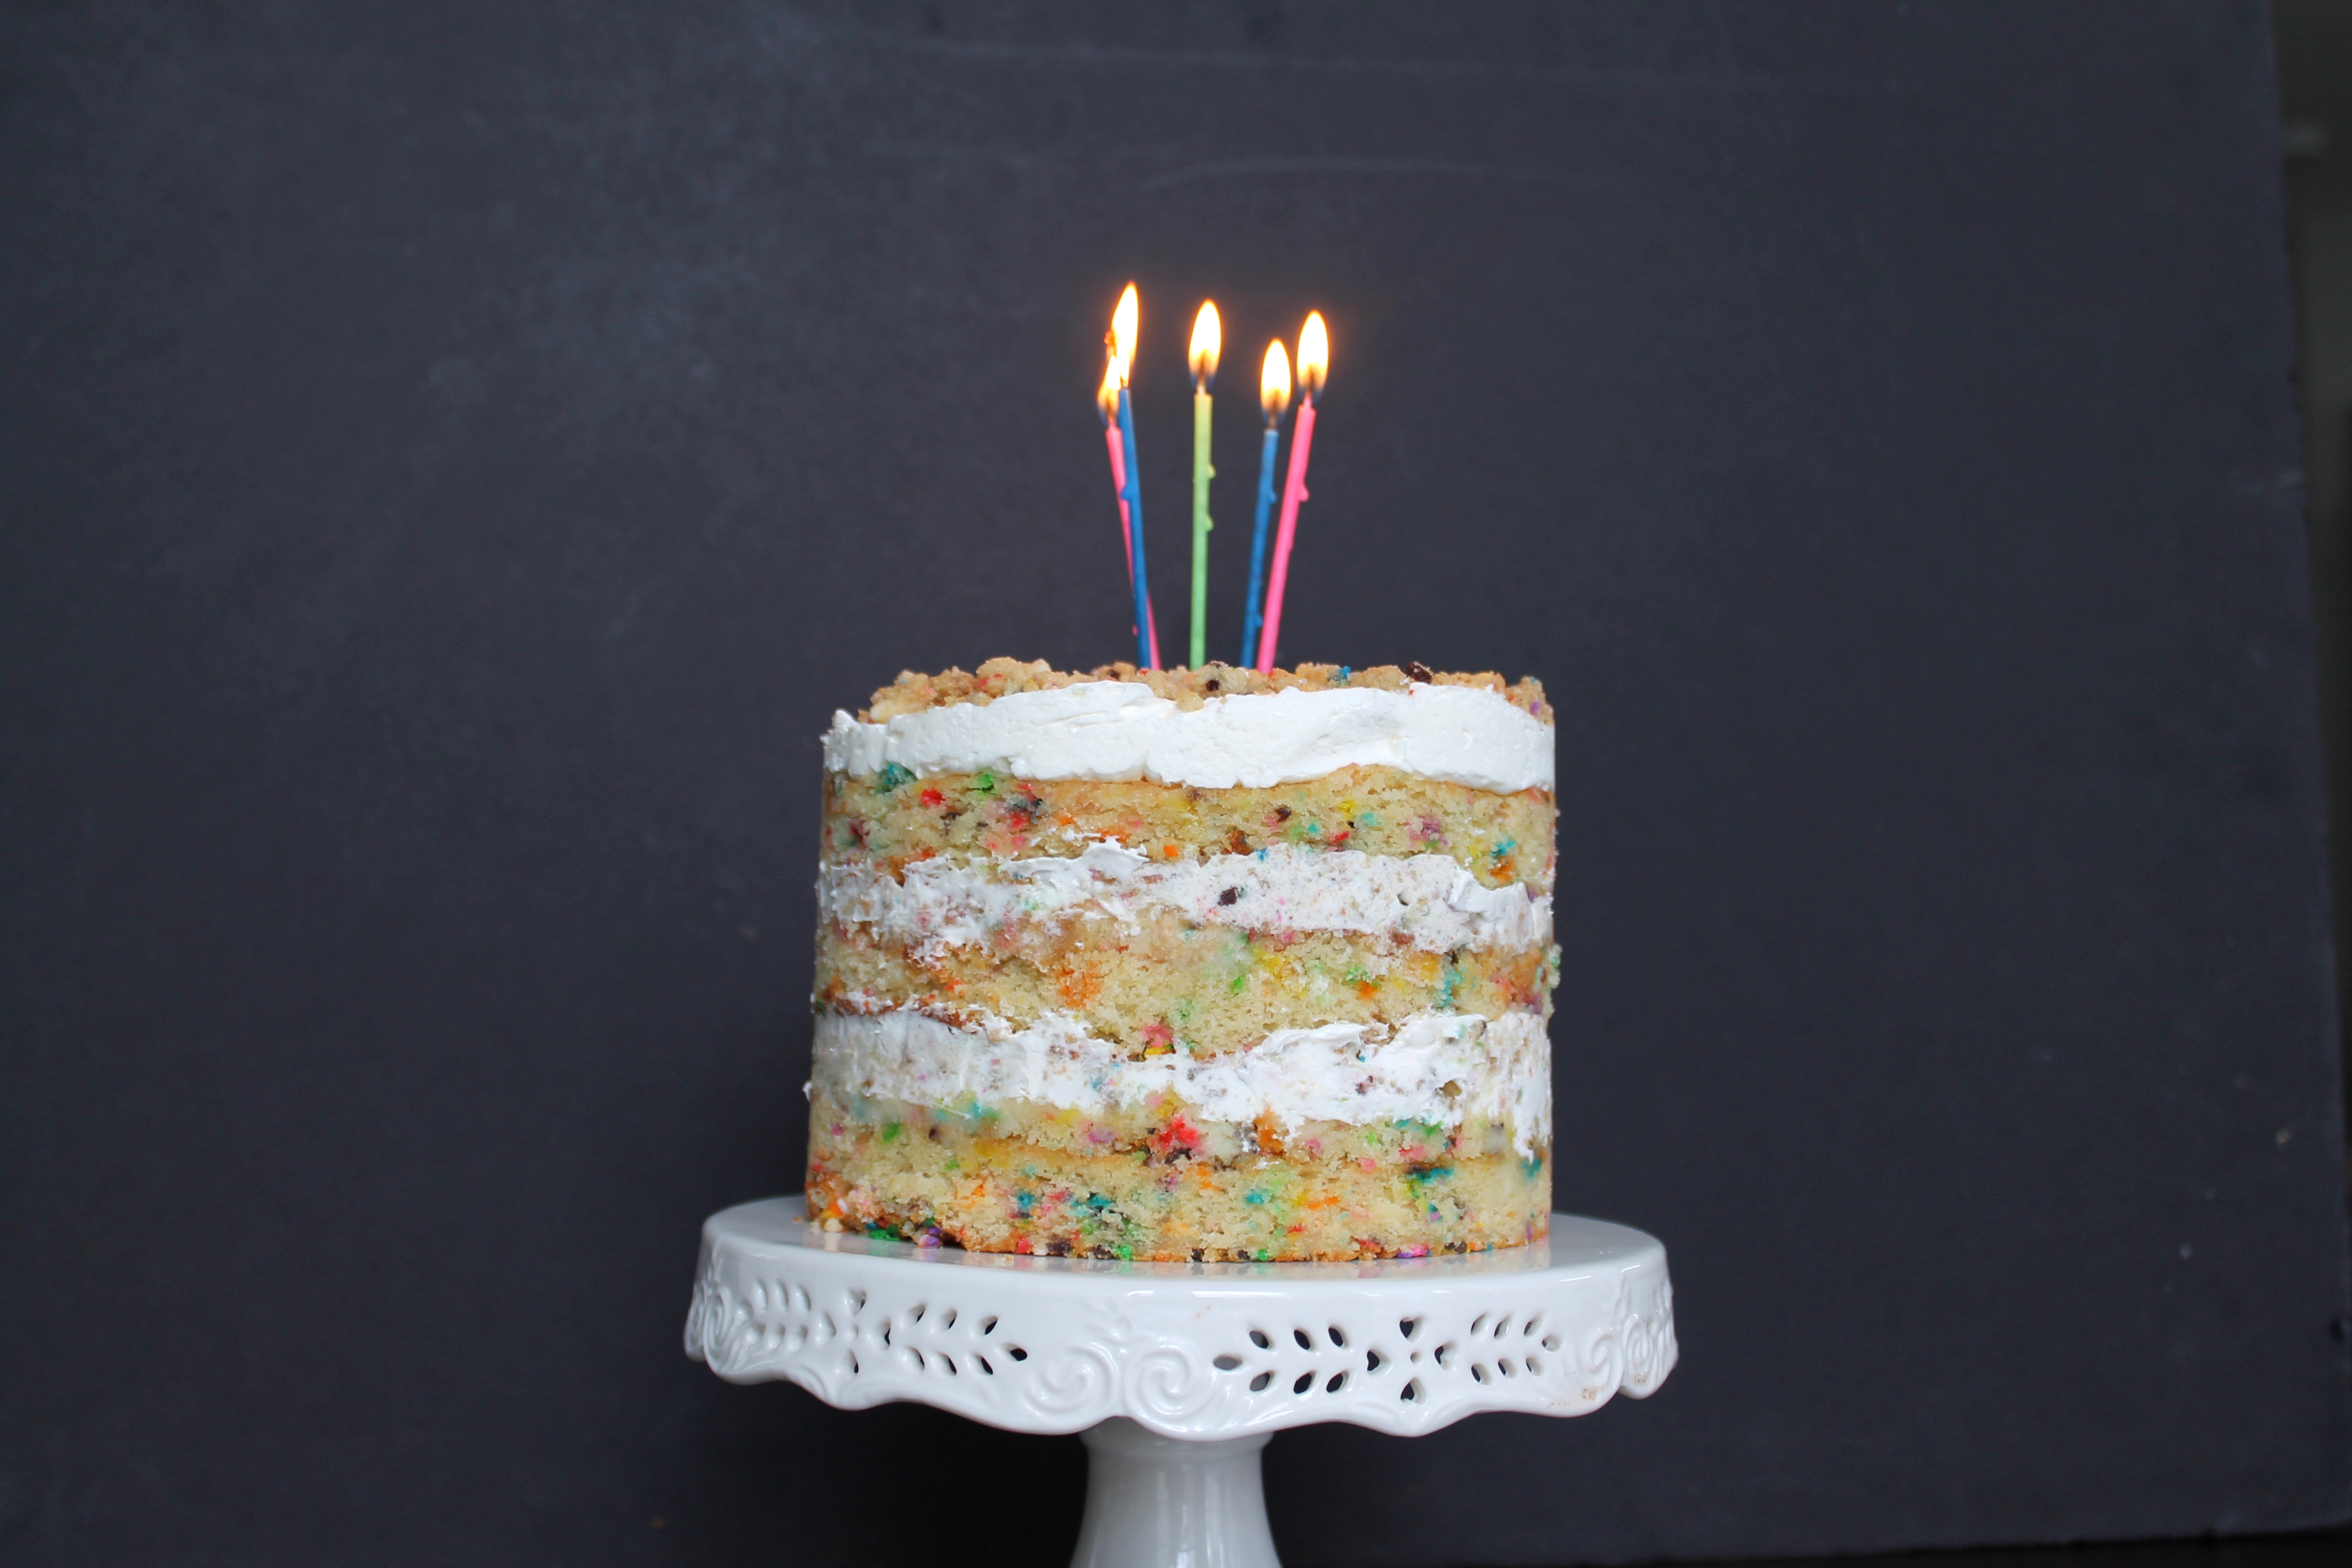
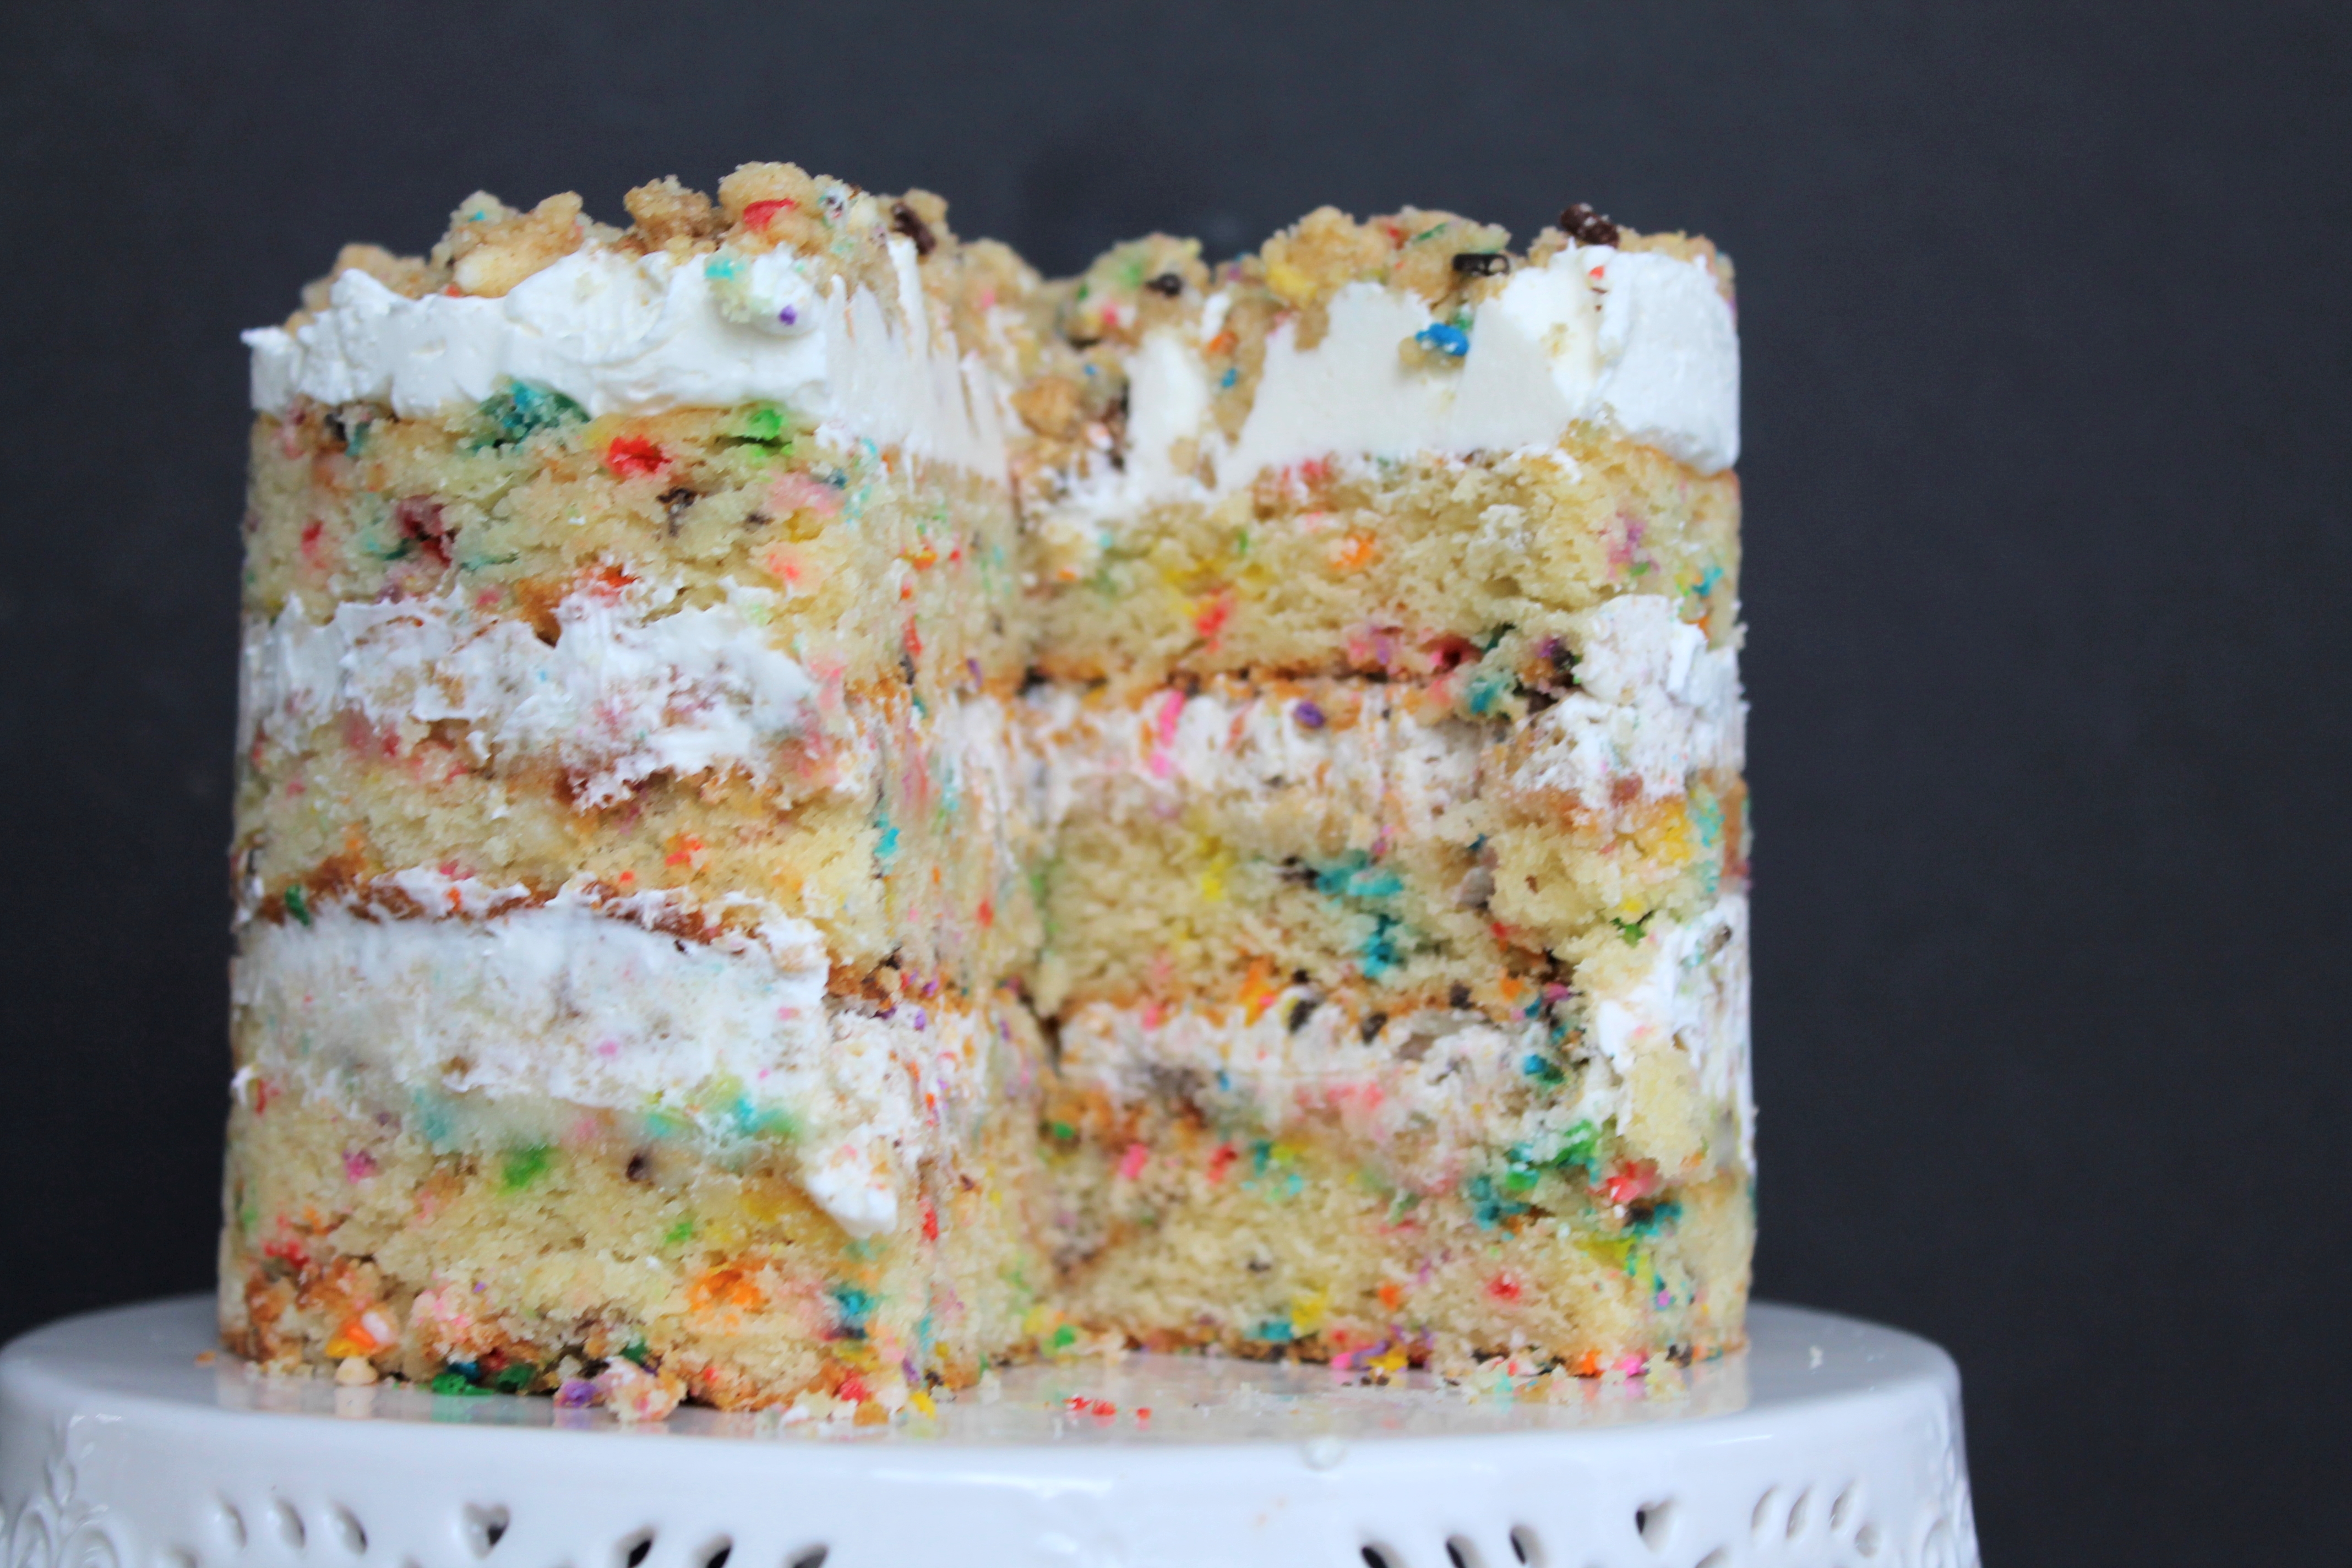
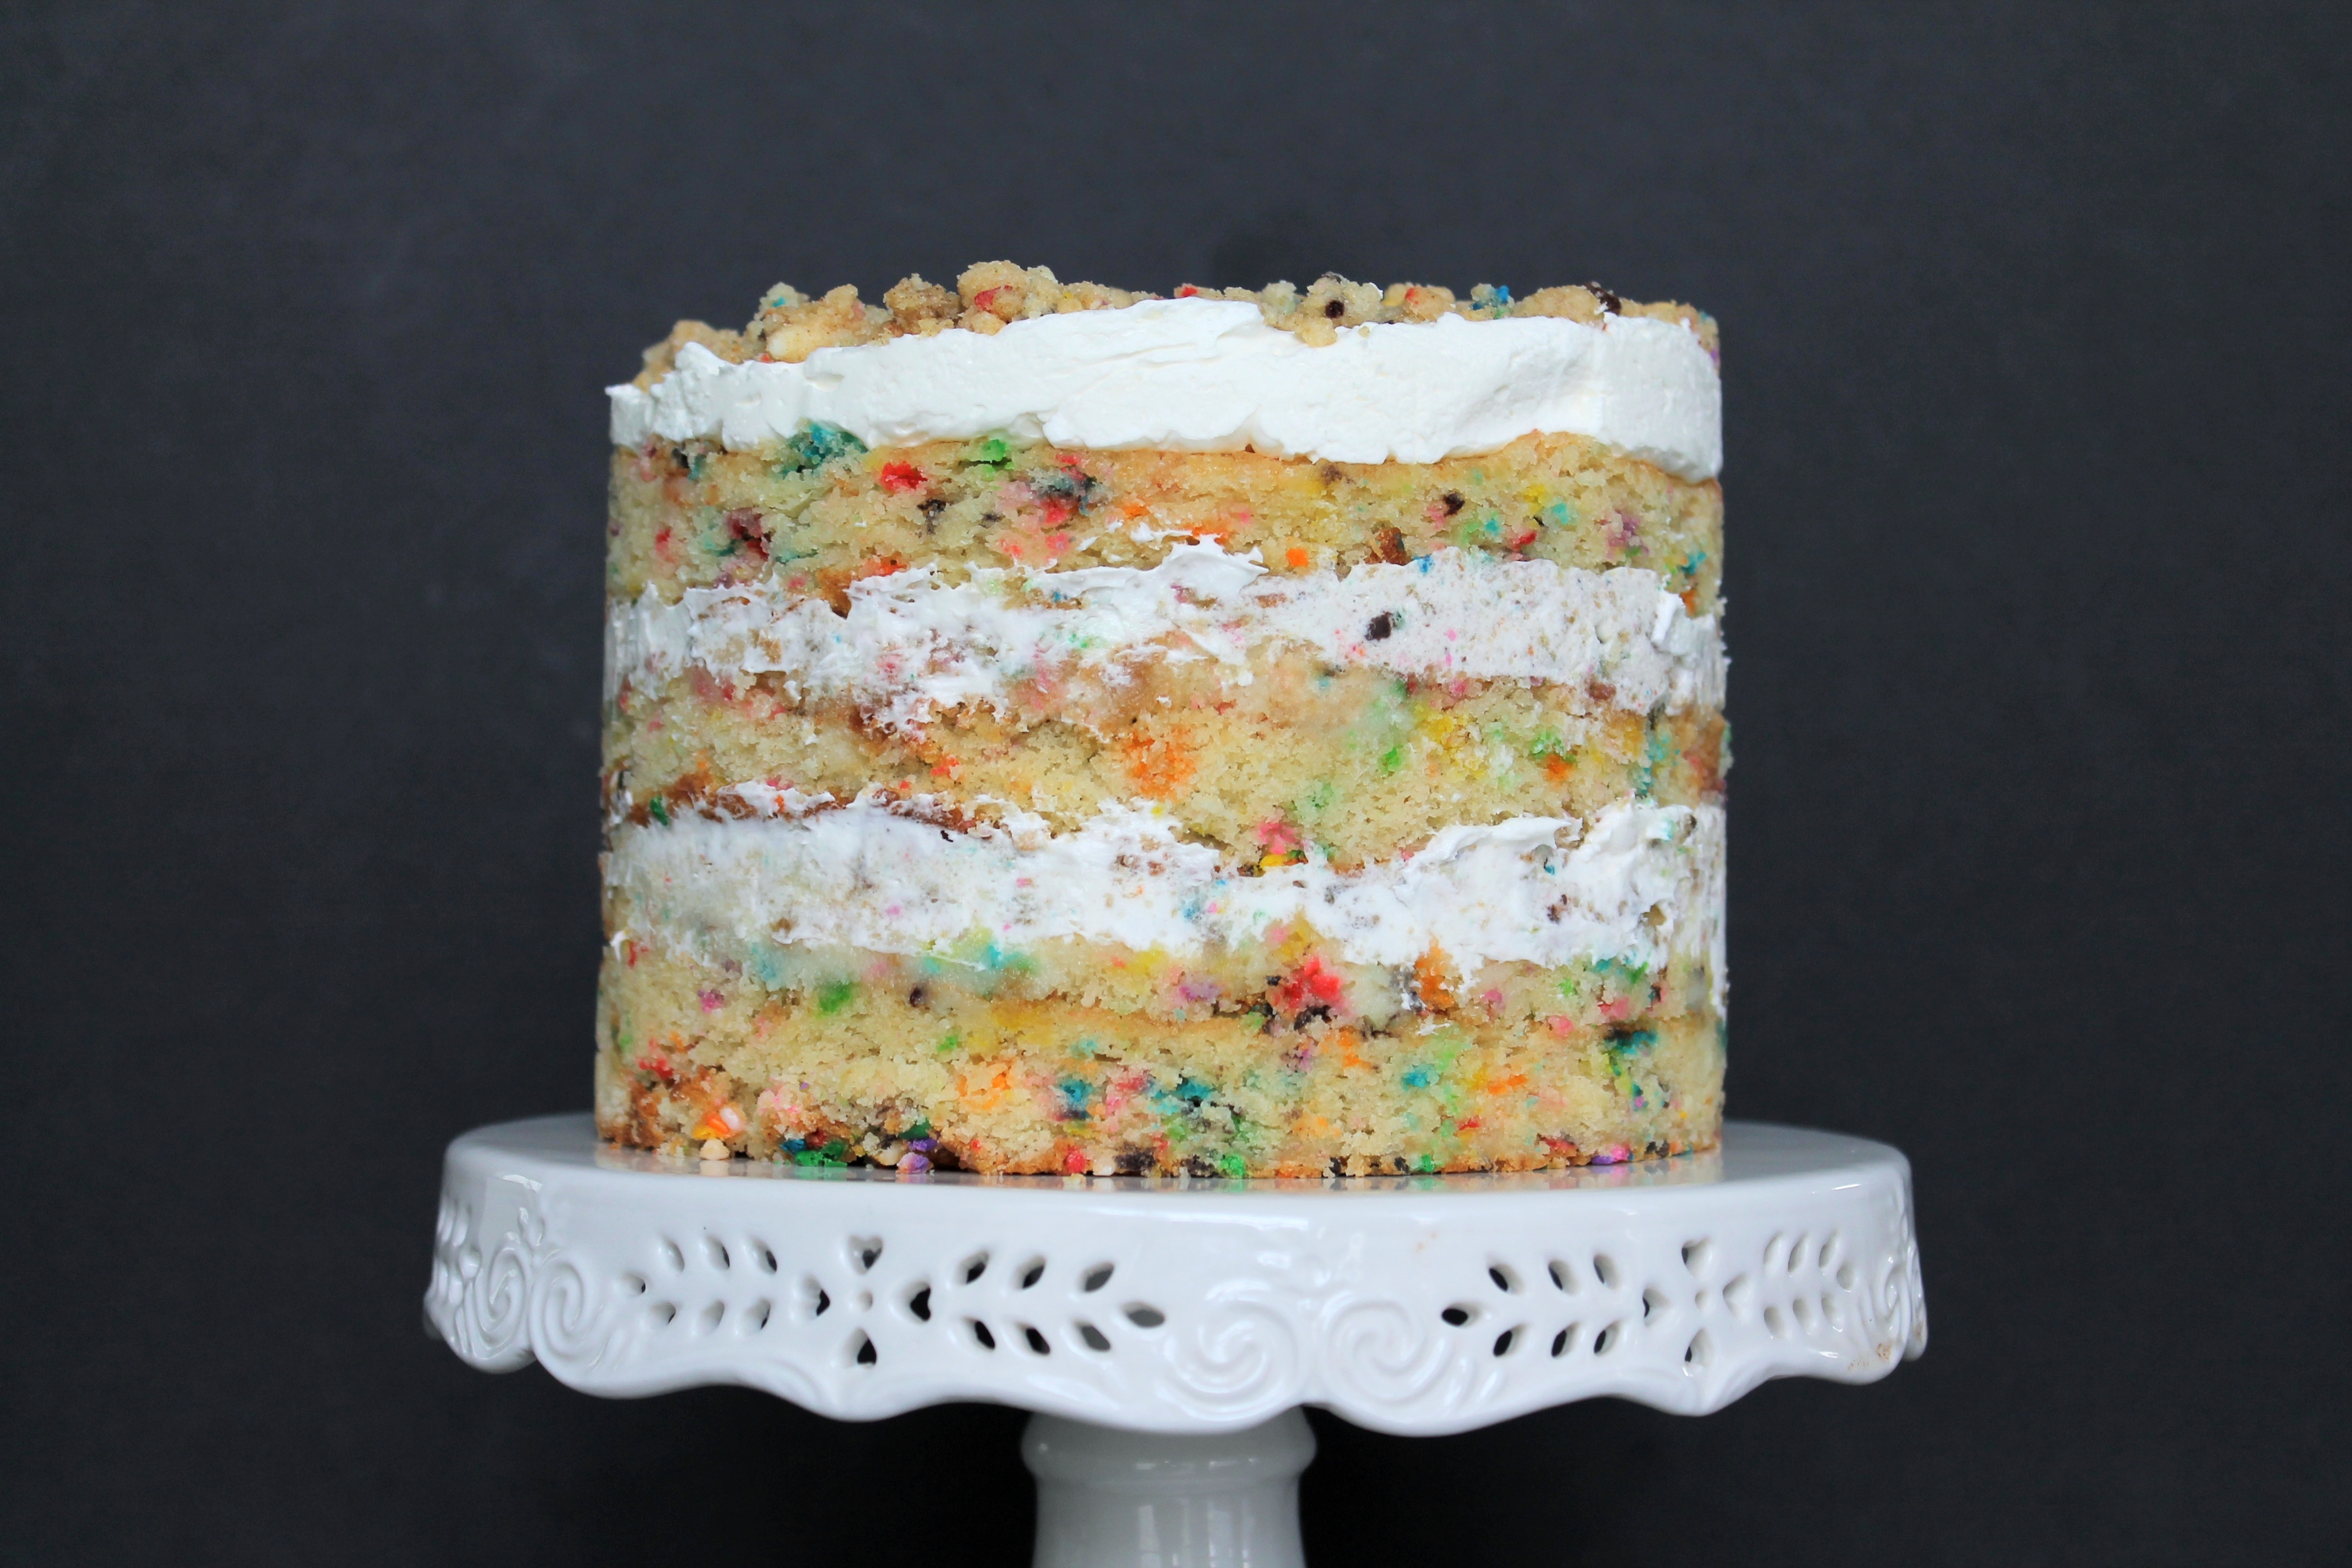 Et voilà! A very tall, very elegant naked cake, neatly wrapped up.
Time to freeze it! Freezing helps the layers and the frosting to set, so that when you reveal the cake it will stay all together (despite the fact that the bottom layer is not terribly structural).
We froze for 1 hour. This was enough time for the cake to set, without becoming so frozen that we had to wait an extra chunk of time for it to thaw to cut it.
 Unwrap the cake. So beautiful!
 Happy Birthday, SLB!
Sing a little birthday song. Or do a victory dance. This cake is worth it!
Milk Bar Funfetti Birthday Cake
lightly adapted from Christina Tosi of Milk Bar
makes one 6″ three-tiered cake/serves 9-12
Cookie Crumb Ingredients:
½ cup sugar
1½ tbsp. light brown sugar
¾ cup flour
½ tsp. baking powder
½ tsp. fine kosher salt
2 tbsp. rainbow sprinkles
¼ cup canola oil
1 tbsp. clear imitation vanilla flavoring
Cookie Crumb Directions:
Preheat oven to 300°. Line a quarter sheet with parchment.
Combine the sugars, flour, baking powder, salt, and sprinkles in a mixer bowl fitted with the paddle attachment. Mix on low speed until well combined.
Add the oil and vanilla and mix again until small clusters form.
Turn the crumbs out onto the baking sheet. Bake for 15–20 minutes, until the crumbs are set and firm on the outsides. They will continue to crisp up as they cool.
Store the crumbs in an airtight container at room temperature for up to 1 week.
Birthday Cake Ingredients:
¼ cup unsalted butter, at room temperature
⅓ cup unflavored vegetable shortening
1¼ cups sugar
3 tbsp. light brown sugar
3 eggs
½ cup buttermilk
⅓ cup canola oil
2 tsp. clear imitation vanilla flavoring
2 cups cake flour OR 1¾ cups all-purpose flour
1½ tsp. baking powder
¾ tsp. fine kosher salt
¼ cup rainbow sprinkles, plus 2 tbsp.
Birthday Cake Directions:
Preheat oven to 350°. Spray a quarter sheet with cooking spray and line the bottom with parchment.
In a mixer bowl, cream the butter, shortening, and sugars at medium-high speed for 2–3 minutes. Scrape the sides of the bowl.
Add the eggs one at a time, mixing and scraping in between, then beat for 2 minutes. Scrape the sides of the bowl.
Whisk the buttermilk, oil, and vanilla together. With the mixer on low speed, stream the liquids into the batter. Increase the mixer speed to medium-high and beat for 4 minutes, until the mixture is practically white, twice the size of the original fluffy butter-and-sugar mixture, and completely homogeneous.
In a separate bowl, whisk together the cake flour, baking powder, salt, ¼ cup of the rainbow sprinkles. Add the dry ingredients to the batter in two batches, stirring until just combined, about 45 to 60 seconds. Scrape the sides of the bowl to ensure all the flour is incorporated.
Scrape the batter into the prepared quarter sheet and spread in an even layer. Sprinkle the remaining 2 tbsp. sprinkles evenly over the top.
Bake the cake for 30–35 minutes, or until it springs back when very lightly touched in the center. (This may require an extra 3–5 minutes.) The top of the cake will be puffed and golden, but still dense.
Allow the cake to cool completely on a wire rack.
The cooled cake can be stored in the fridge, wrapped in plastic wrap, for up to 5 days.
Frosting Ingredients:
½ cup unsalted butter, at room temperature
¼ cup unflavored vegetable shortening
½ cup/2 oz. cream cheese
2 tbsp. light corn syrup
1 tbsp. clear imitation vanilla flavoring
1¼ cups confectioner’s sugar
½ tsp. fine kosher salt
⅛ tsp. baking powder
⅛ tsp. citric acid
Frosting Directions:
Combine the butter, shortening, and cream cheese in a mixer bowl and cream for 3 minutes, until smooth and fluffy. Scrape the sides of the bowl.
Add the corn syrup and vanilla. Beat another 2 minutes, until the mixture is silky smooth and glossy white. Scrape the sides of the bowl.
Sift the confectioner’s sugar, salt, baking powder, and citric acid into the bowl. Mix on low speed until incorporated, then beat on high speed for 3 minutes, until the frosting is smooth, creamy, and stark white.
Store the frosting in an airtight container in the fridge for up to 1 week.
Assembly Ingredients and Tools:
1 recipe Birthday Cake
6″ cake ring
2 strips acetate (3″x20″)
¼ cup milk
1 tsp. clear imitation vanilla flavoring
1 recipe Frosting
1 recipe Cookie Crumbs
Directions:
Turn the birthday sheet cake out onto a thin cutting board. Using the cake ring, cut two rounds as close to the edges as possible. These will form the top two layers of the cake. Then cut two semicircles from the scraps.
Place the cake ring on a cutting board or cookie sheet lined with foil or parchment paper. Line the inside of the cake ring with the acetate strips, taped together to form a 6″ tall cylinder.
Lay the two semicircles of cake in the base of the cake ring. Fill in the center with as much of the remaining cake scraps as needed to make a flat, even layer.
In a small bowl, whisk together the milk and vanilla to make a soak for the cake. Using a pastry brush, paint about half of the soak over the whole base layer of the birthday cake.
Divide the frosting into five equal amounts. With a small spatula or the back of a spoon, spread one-fifth of the frosting over the bottom layer of cake. Sprinkle ⅔ cup cookie crumbs evenly over the frosting. Carefully spread another fifth of frosting over the cookie crumbs, making sure to work the frosting all the way to the edges of the cake ring.
Gently press one of the 6″ cake round down into the acetate cylinder over the frosting. Brush with the remaining milk soak. Repeat the layers of frosting, cookie crumbs, and frosting.
Press the last round cake down over the middle layer of frosting. Spread the final fifth of frosting over the cake and sprinkle with the remaining cake crumbs (or use just ⅔ cup, and eat the small amount of leftover crumbs!).
Place the cake, still sitting inside the ring and acetate strips, into the freezer for 1 hour to help set the shape.
Remove from the freezer and unmold from the cake ring and acetate. Allow to sit at room temperature for 5 minutes before cutting with a very sharp knife.
The cake can be stored in the fridge with the edges wrapped in plastic for up to 5 days.
Enjoy with a glass of milk!
- One year ago: Overnight Oats with Coconut, Honey Almonds, and Chocolate
- Two years ago: Double Chocolate Spice Muffins
- Three years ago: Espresso Ice Cream
- Four years ago: Rotini with Asparagus and Goat Cheese
- Five years ago: Brown Butter Chocolate Chip Cookies
12 comments to “Milk Bar Funfetti Birthday Cake”
Sarah@WellDined - April 1, 2016
So beautiful, and so delicious. I feel very accomplished! Happy Birthday, SLB!
Melissa - April 1, 2016
Thanks! It was a joy to bake and celebrate this milestone with you!
Luice - April 1, 2016
This may be easy but so many instructions! >.<
I may stick with box funfetti for now.
Happy Birthday Smells like Brownies!! Thanks for all your yummy foods 🙂
Melissa - April 1, 2016
Hey now. In my defense, I did actually say this cake was ridiculous and hard and time consuming. I just had to try it at least once! 😉
sarahjmir - April 1, 2016
You’re so brave to make this! I am going to be a big fat chicken and wait for it’s second incarnation!
Melissa - April 1, 2016
Haha, thanks. I will get right on the sheet cake version, then!
sarahjmir - April 2, 2016
Can’t wait!
chefceaser - April 3, 2016
Reblogged this on Chef Ceaser.
Sarah@WellDined - May 20, 2016
Finally posted my version, lol.
Melissa - May 20, 2016
So glad we got to make this together!
Flowers Calcutta - July 27, 2016
Wow, those cakes are absolutely lovely!!!
Melissa - July 27, 2016
Thank you!